Videos
Inter-septo-columellar approach
Pr Justin Michel
Treating a nasal valve with hyaluronic acid: it's possible!
Pr Thomas Radulesco
Endoscopic spreader flaps: technical points
Pr Thomas Radulesco
Sliding alar cartilage flap (commented video)
Pr Thomas Radulesco
How to raise the tip of the nose: the lateral crural steal (…
Pr Thomas Radulesco
Rhinoplasty morphing tutorial: Photoshop vs. mobile applicat…
Pr Thomas Radulesco
Medical cannula rhinoplasty: secondary correction of surgery…
Pr Thomas Radulesco
Management of a hyperprojected nose through a concealed appr…
Pr Thomas Radulesco
ADV Library
In this section, you will find dissertations and PowerPoint presentations sent by our contributors.
Surgical techniques atlas
Hidden approaches
The « inter septocolumellaire »
The « inter septocolumellaire » is the incision of a basic septoplasty. It must not be plotted in relation to the caudal edge of the septum, varying in its form and in its position. It should be plotted 2mm back from mesial crus (at the intersection of hair implantation), which is easily distinctive if you carry out a traction on the columella by using a simple or a double hook. It is made on a bilateral basis.
It must be extended downwards and backwards, so as to enable a precise dissection all along the caudal edge of the nasal septum and nasal spine.
 L’incision inter-septocolumellaire
It goes up under the dome, onwards and on top of the plica nasi.
It is associated to a dissection of the quadrangular cartilage under perichondrial and can be extended with a transcartilaginous incision.
Intercartilaginous hidden approach
It is the easiest of surgical approaches. It allows the access to the dorsum of the nose without touching the tip of the nose. Plotted 2mm above the plica nasi, it is extended with the inter septocollumellaire incision. It goes in the intersection of two lateral cartilages area where the latter ???????
Elle passe dans la zone de jonction des 2 cartilages latéraux où ces éléments de téléscopent plus ou moins selon les cas.
It reaches the interseptocolumellaire incion. It supplies a wide surgical approach to the nose, to the septo-triangular vault and to the bones, but also to the alary lateral crus using the retrograde technique.
 The inter-cartilaginous incision
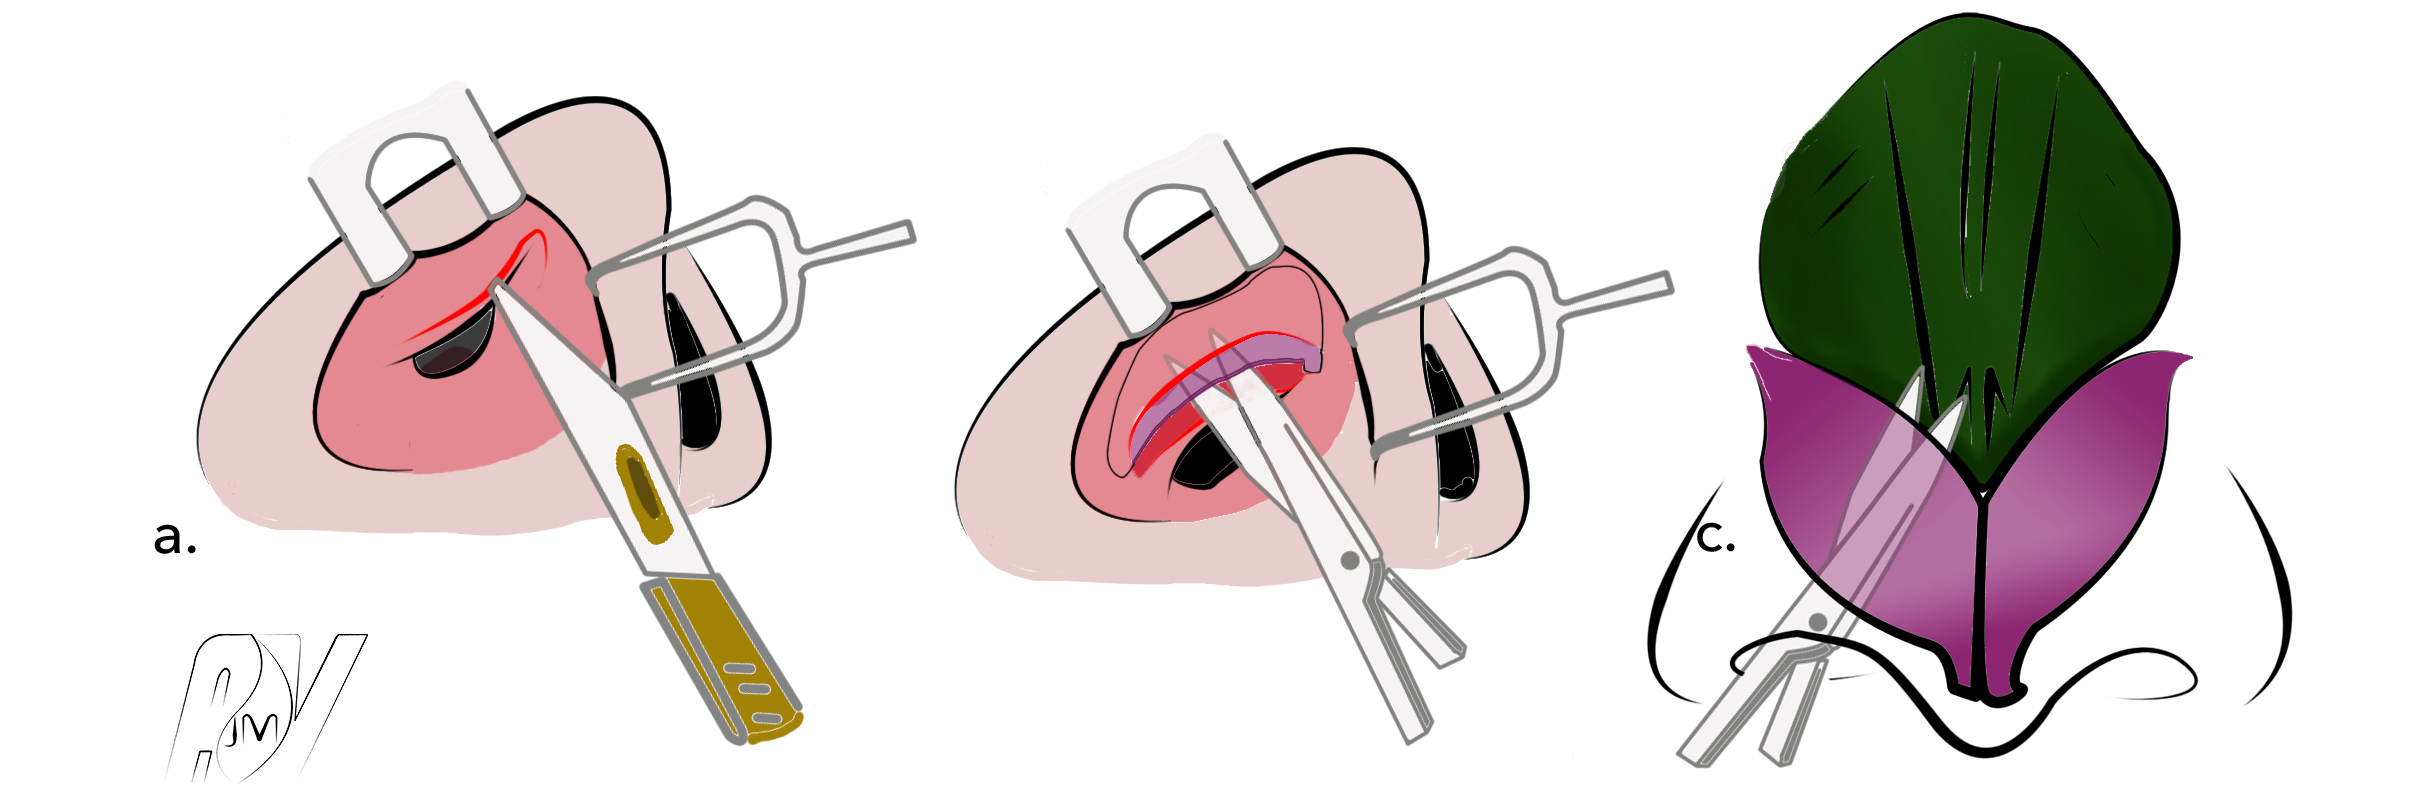
Transcartilaginous hidden approach or transcartilaginous lateral incision
The transcartilaginous incision allows the resection, by hidden approach, of a part of alaires’ superior strips. As a consequence, it diminishes the volume of the tip of the nose and it can apply a cephalic rotation and access the dorsum of the nose. Its track is globally parallel to that of the intercartilaginous, but way higher than that of the plica nasi. The height of the incision depends of the quantity of cartilage that is to be resected. It must be plotted at the level of the area of the desired resection of the lateral crus (the inferior edge of the resection of the superior strip), starting inside the dome, spotted if necessary by the initial setting of the edge of the aspiration. It somehow follows the direction of the nasal hole and ends up insided the nose wing aplomb.
![]()
The trans-cartilaginous surgical approach
VInferior marginal hidden approach (or rim incision)

The inferior marginal approach
The marginal approach is a reliable alternative to the external approach as far as edge work is concerned. It links an intercartilaginous approach and a marginal incision to an interseptocolumellaire. It does not lead to consequences if it is genuinely endonasal and if it conforms to the « soft triangle » :
- At the columella level, do not follow the inferior edge of the mesial which is too superficial. You need to do an incision from 2 to 3 mm above it.
- At the dome level, carefully follow the inferior edge of the cartilage so as to conform to Converse’s soft triangle.
- At the lateral level, the inferior edge of the cartilage, there is no particular difficulty as the cartilage gradually moves away from the nasal edge.
This approach allows a complete exposition of the alaire in bucket handle and a precise statement of the situation.
It can be extended towards the bottom of the columella in order to totally expose the mesual crus and carry out adjustments if necessary.
The external approach
The external approach is recommended in case of an important tip work or a complex secondary rhinoplasty. Many types of columellary incisions can be made.
Detachment of the said extra-mucous
The « low (septal) » and « high (under the CLS) » extramucous.
The detachment of the said extramucous corresponds to the dissection of the osteo-cartilaginous structures of the nasal septum and the septo-triangular dihedral in the plan under perichondrial. The first time as far as septoplasty is concerne dis also a time to perform before the resection of the osteocartilaginous bump so as to enable the libération of the mucous duths and avoid them being injured during the excision of the bump. This technique can be made under optic.
Septoplasty
In case of septal deviation, a septoplasty by endoscopic approach can be made. Depending on the type of deviation, different techniques can be applied but a resection according to Killian’s technique is always made except in the case of very high deviations or anterior from the septum.
Different types of septal fractures
Septo-triangular disjunction
It is one of the times of osteocartilaginous bump resection. It actually separates the nasal septum from the CLS. It is made after the réalisation of the high extramucous -liberation of the mucous under the CLS- and the rugination of the dorsum. The liberation of the mucous under the CLS is of a major functional importance as far as the preservation of the integrity of the nasal valve is concerned. You can cut closely around the nasal septum, without any resection of the CLS, so you can maintain in the meantime the portion of CLS constituting the bump – their median part. Therefore, the height of the cartilaginous section on the CLS is variable according to the height of the bump to resect. The incision of the cartilage must be done from onwards to backwards up to the OPN.
Septo-triangular disjunction
Surplus of the septum’s caudal edge
The excision of the septum’s caudal edge allows to easily diminish the projection of the tip of the nose. This time is compulsory so as not to be exposed to a resection of a too generous bump. The septum must be shortened after having dissected its caudal edge under perichondrial (area of resection in red on the scheme).
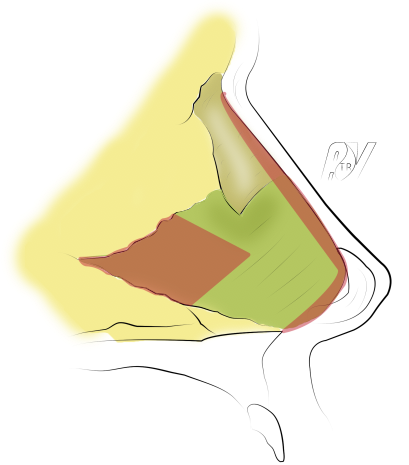
In red, the cartilaginous resection.
The excision must be very careful so as not to alter the maxillo-septal angle : with the columella placed in the desired position, the septal segment is easy to determine and to sever with a scalpel. The section must respect the small normal septal overhang before the nasal spine and will then be straight on the 2/3 subsequents of the caudal edge to get back up in its anterior 1/3. The resected segment will be shaped as a shuttle which is slightly bulbouçs at its anterior edge with a width from 3 to 6 mm on average.
Once this gesture performed, the tip reduced in its volume and raised to the good position, you can move on with the time of the bump excision. The resection of the caudal edge must be limited, not to say absent in some cases, especially when a tongue-in-groove or a septal extension graft is considered.
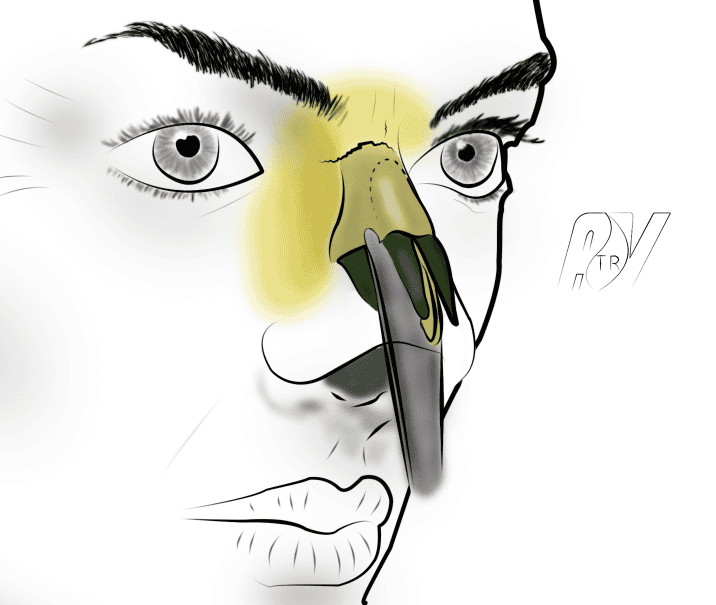
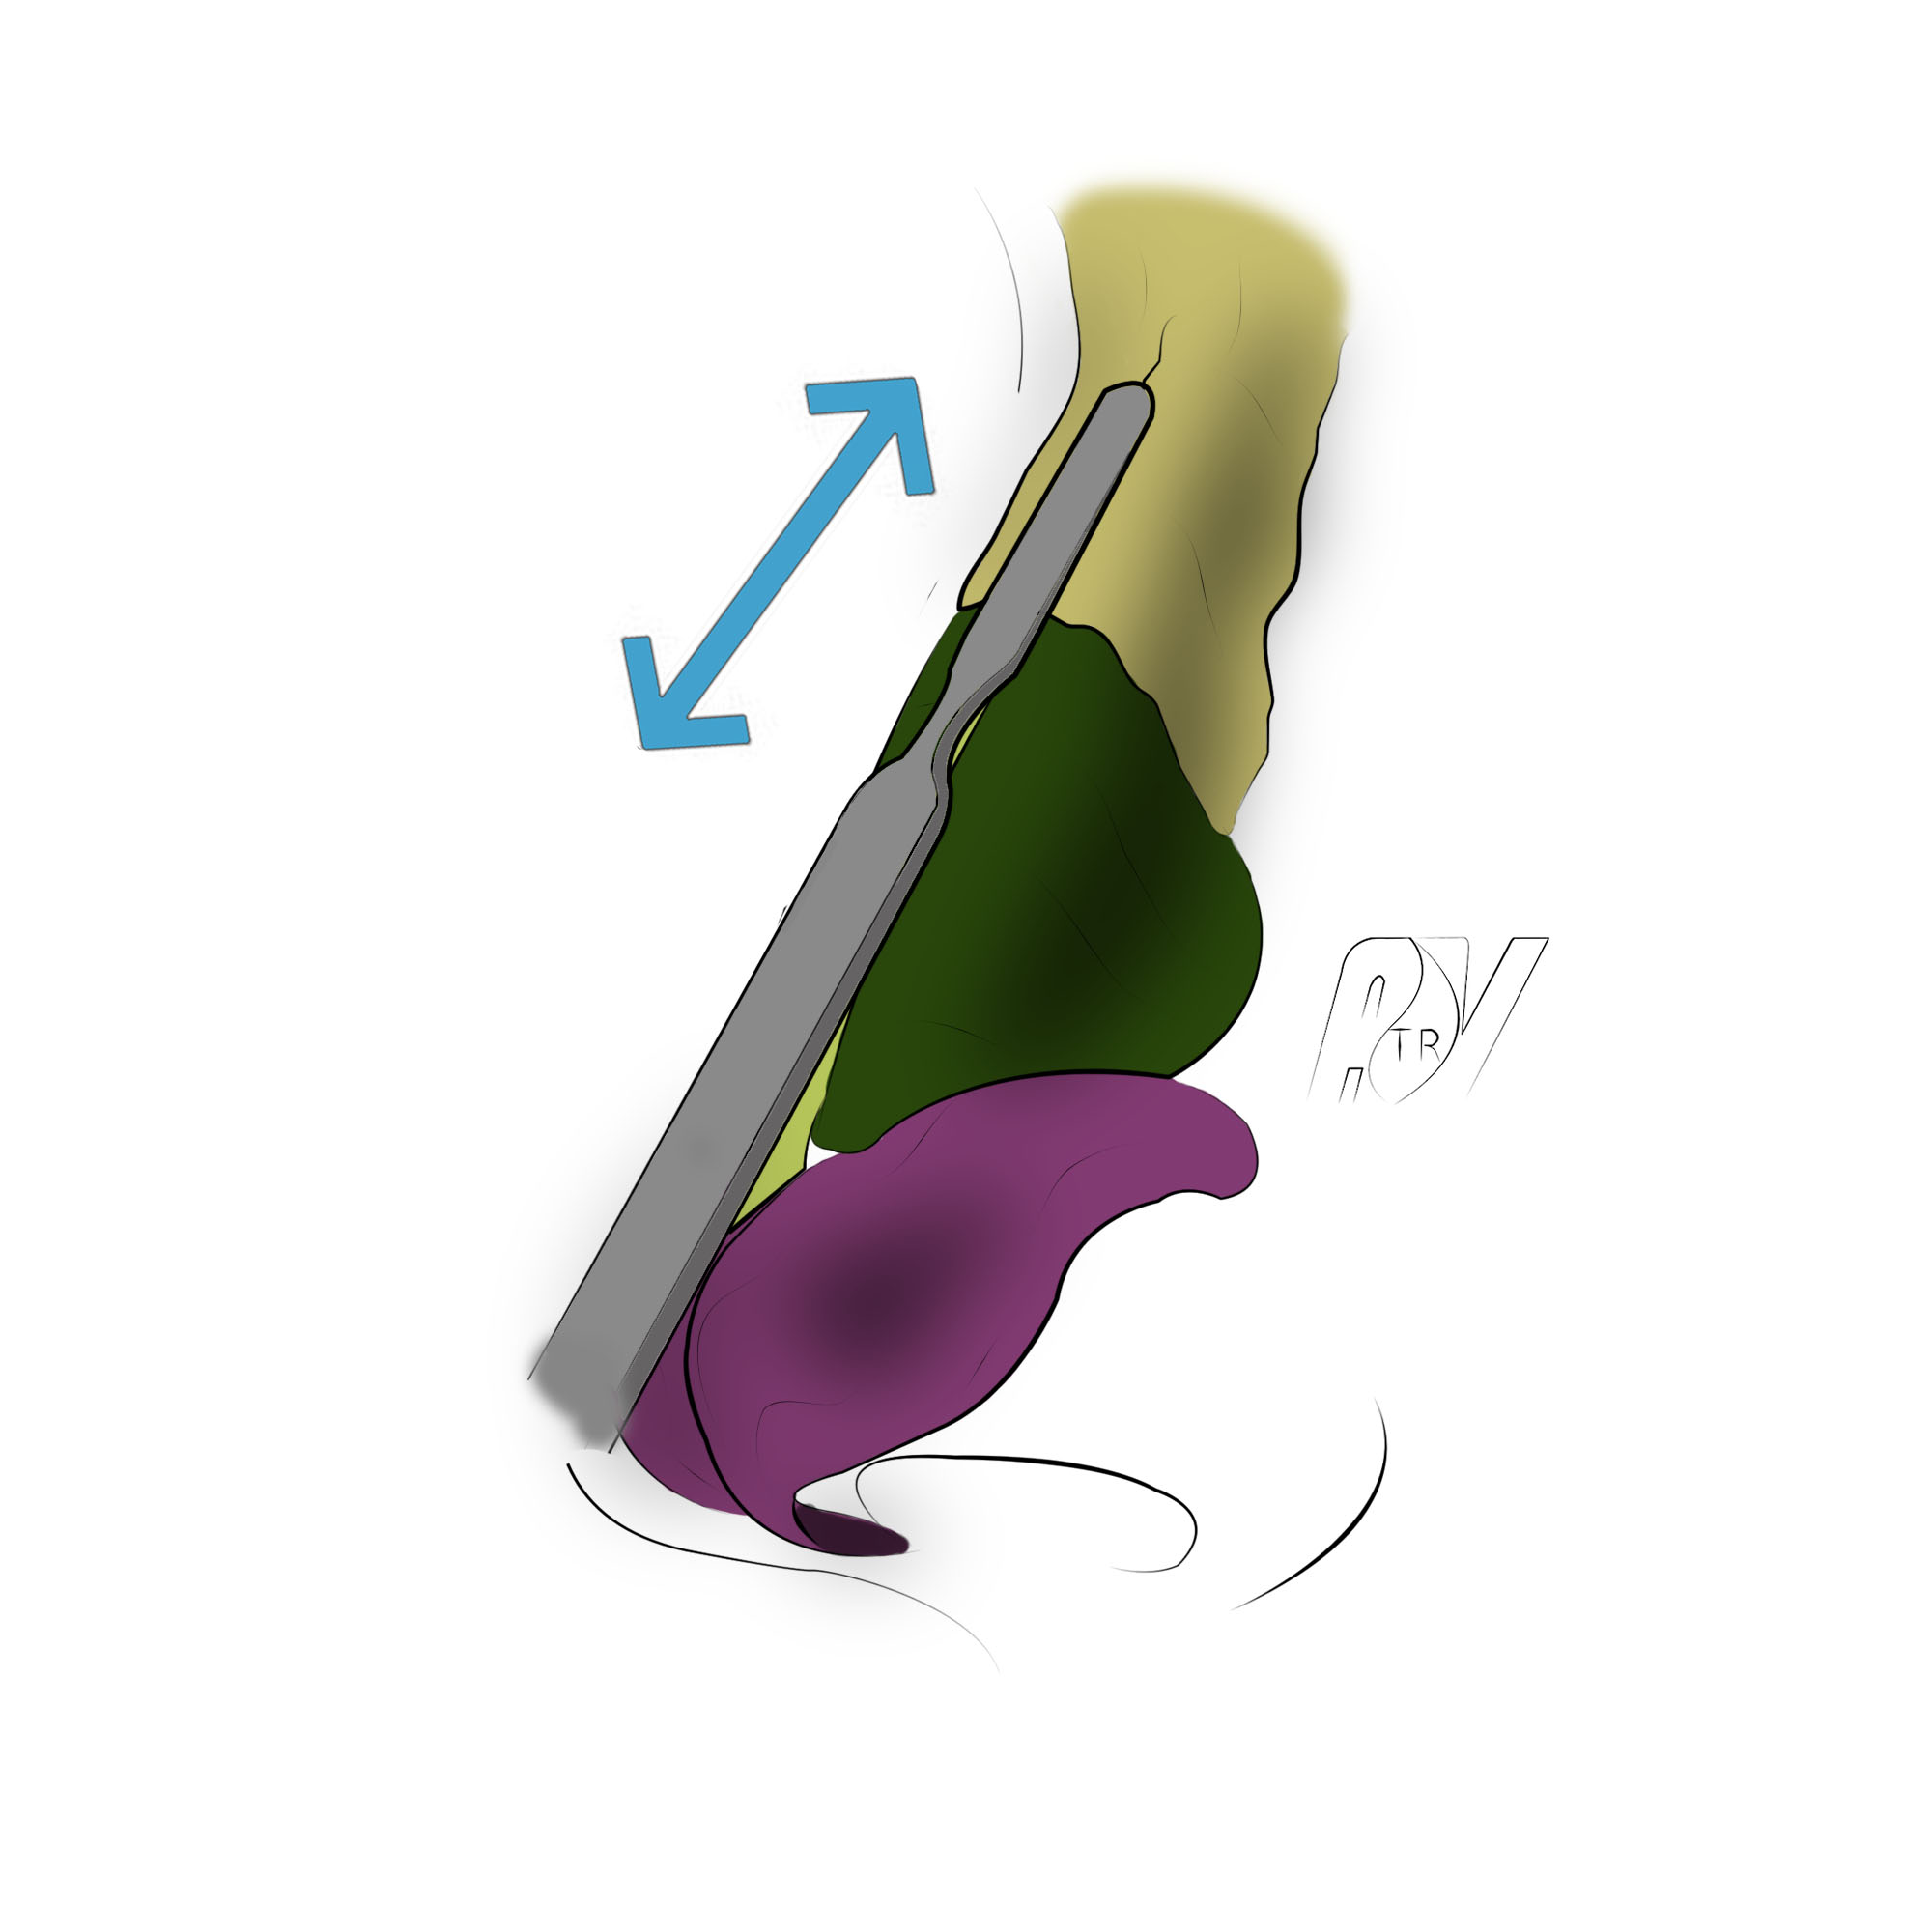
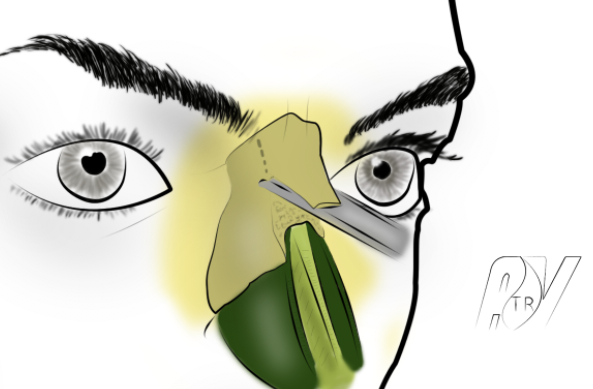
Oseto-cartilaginous bump resection
Oseto-cartilaginous bump resection can be made in a monobloc way.
This section is to be privileged in cases of high and important kyphosis, accompanied by an excessive wide nose root, needing low-to-low osteotomies with out fracture.
In theses cases, the grater technique might only lead to a defect correction unenabling a sharp angulation of the nose frontal part. This technique also allows the digging of the nose frontal angle.
Before the section, the invaginated mucosa in the osseous dihedron must be cleared by a wide extra-mucosa technique. The static nose is exposed by an inter-septo-columelary incision, the freed osseous nose on the area is taken off. A cutaneous landmark can be traced on the bump section. An extramucosa of the superior osteo-cartilaginous dihedron must be performed. This time can be made under optic. The CLS are sectioned from their septal clip (septo-triangular disjunction). The mucosa is dissected on the inferior face and on the corresponding septal slopes and then freed under the awning of clean bones. It can then be repressed downwards. A tile poised under the teguments exposes the septum dorsal edges and the 2 CLS. They are sectioned with a lancet or a pair of thin Cottle scissors depending of the cutaneous landmark. The use of endoscope can be a great help for this time. It is also possible to resect the superior nasal septum edge and the median parts of the 2 CLS thanks to a cold lancet. The cartilaginous bump can then be sectioned in a monobloc.

Cartilaginous bump resection with a cold lancet
In this way can be determined 3 cartilaginous strips (Scheme25) under which is introduced a burin sectioning the osseous bump following the cartilaginous section direction.
The bump can be taken off in a monobloc with a segment tapered in the form of shuttle and a cartilaginous segment with septum and the CLS on its median line.
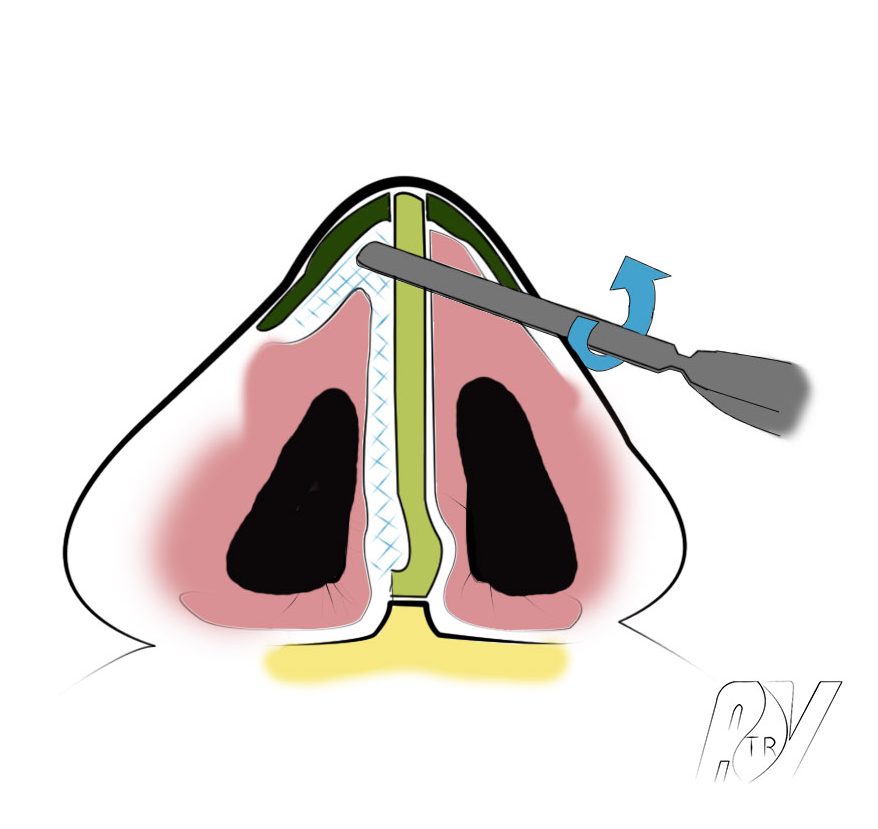
Osseous bump resection using double-shouldered osteotome
This technique can be expanded upwards at the naso-frontal angle in order to enable its digging while high kyphosis is associated to a filling of that angle.
It can be necessary to lead some ending proceedings so as to avoid a double risk : on the one hand, the monobloc section with the burin may have been too generous or asymmetrical, and on the other hand, the median rapprochement of the clean bones can be imperfect, leaving a diastasis.
After making the post-operatory oedema disappear, the risk is to provoke an irregular ridge with a very unpleasant track marked by the discarded clear bones. The prevention of these quite frequent imperfections must be made by the setting of an osteo-cartilaginous graft taken at the expense of the bump. It is constituted at the superior part of the clear bone, in the inferior part by the triangular cartilage.
It must be perfectly regular and be set by two leading wires , the trans-osseous superior outgoing at the level of the naso-frontal angle, the inferior transcartilaginous at the level of the sus-lobulary area. By default a 4mm graft of septal cartilage can be placed so as to cover the ridge. Biological glue can help stabilizing the operation.
Section with a grater
Grafting of the osseous bump
First thing to situate is the wished level on the skin depending on a straight line from the naso-frontal angle until the lobule plan. The grafting osseous resection is made with low range movements so as not to touch cartilage. You need to stay symmetrical on the 2 clean bones which sometimes need to be shortened in their width by acting laterally. The bones dirt is taken off by ventilation after a saline lavage. Once the correction is made, we depress the skin, which highlights the cartilaginous section that must be done. The cartilaginous resection is made on the septo-triangular vault that needs to be taken off the underlying mucuous plan. The CLS can be cut off at the wishtjed level and raised as fins adjoining septum area which will then be selected. However, the CLS can also be freed from the septum and the mucuous dihedron taken off in order to select the septal ridge and the 2 CLS.
In any way, this section must be very sharp, regular, symmetrical and made with thin Cottle scissors. At first, you better make a limited exeresis that would be eventually completed. You must check the result by palpating, searching for any irregularity and under control of the vision being aware of the CLS edges – that are too slender to be palpated- and the junction area with the clear bones where a cartilaginous segment that needs to be taken off often remains.
Naso-frontal angle digging
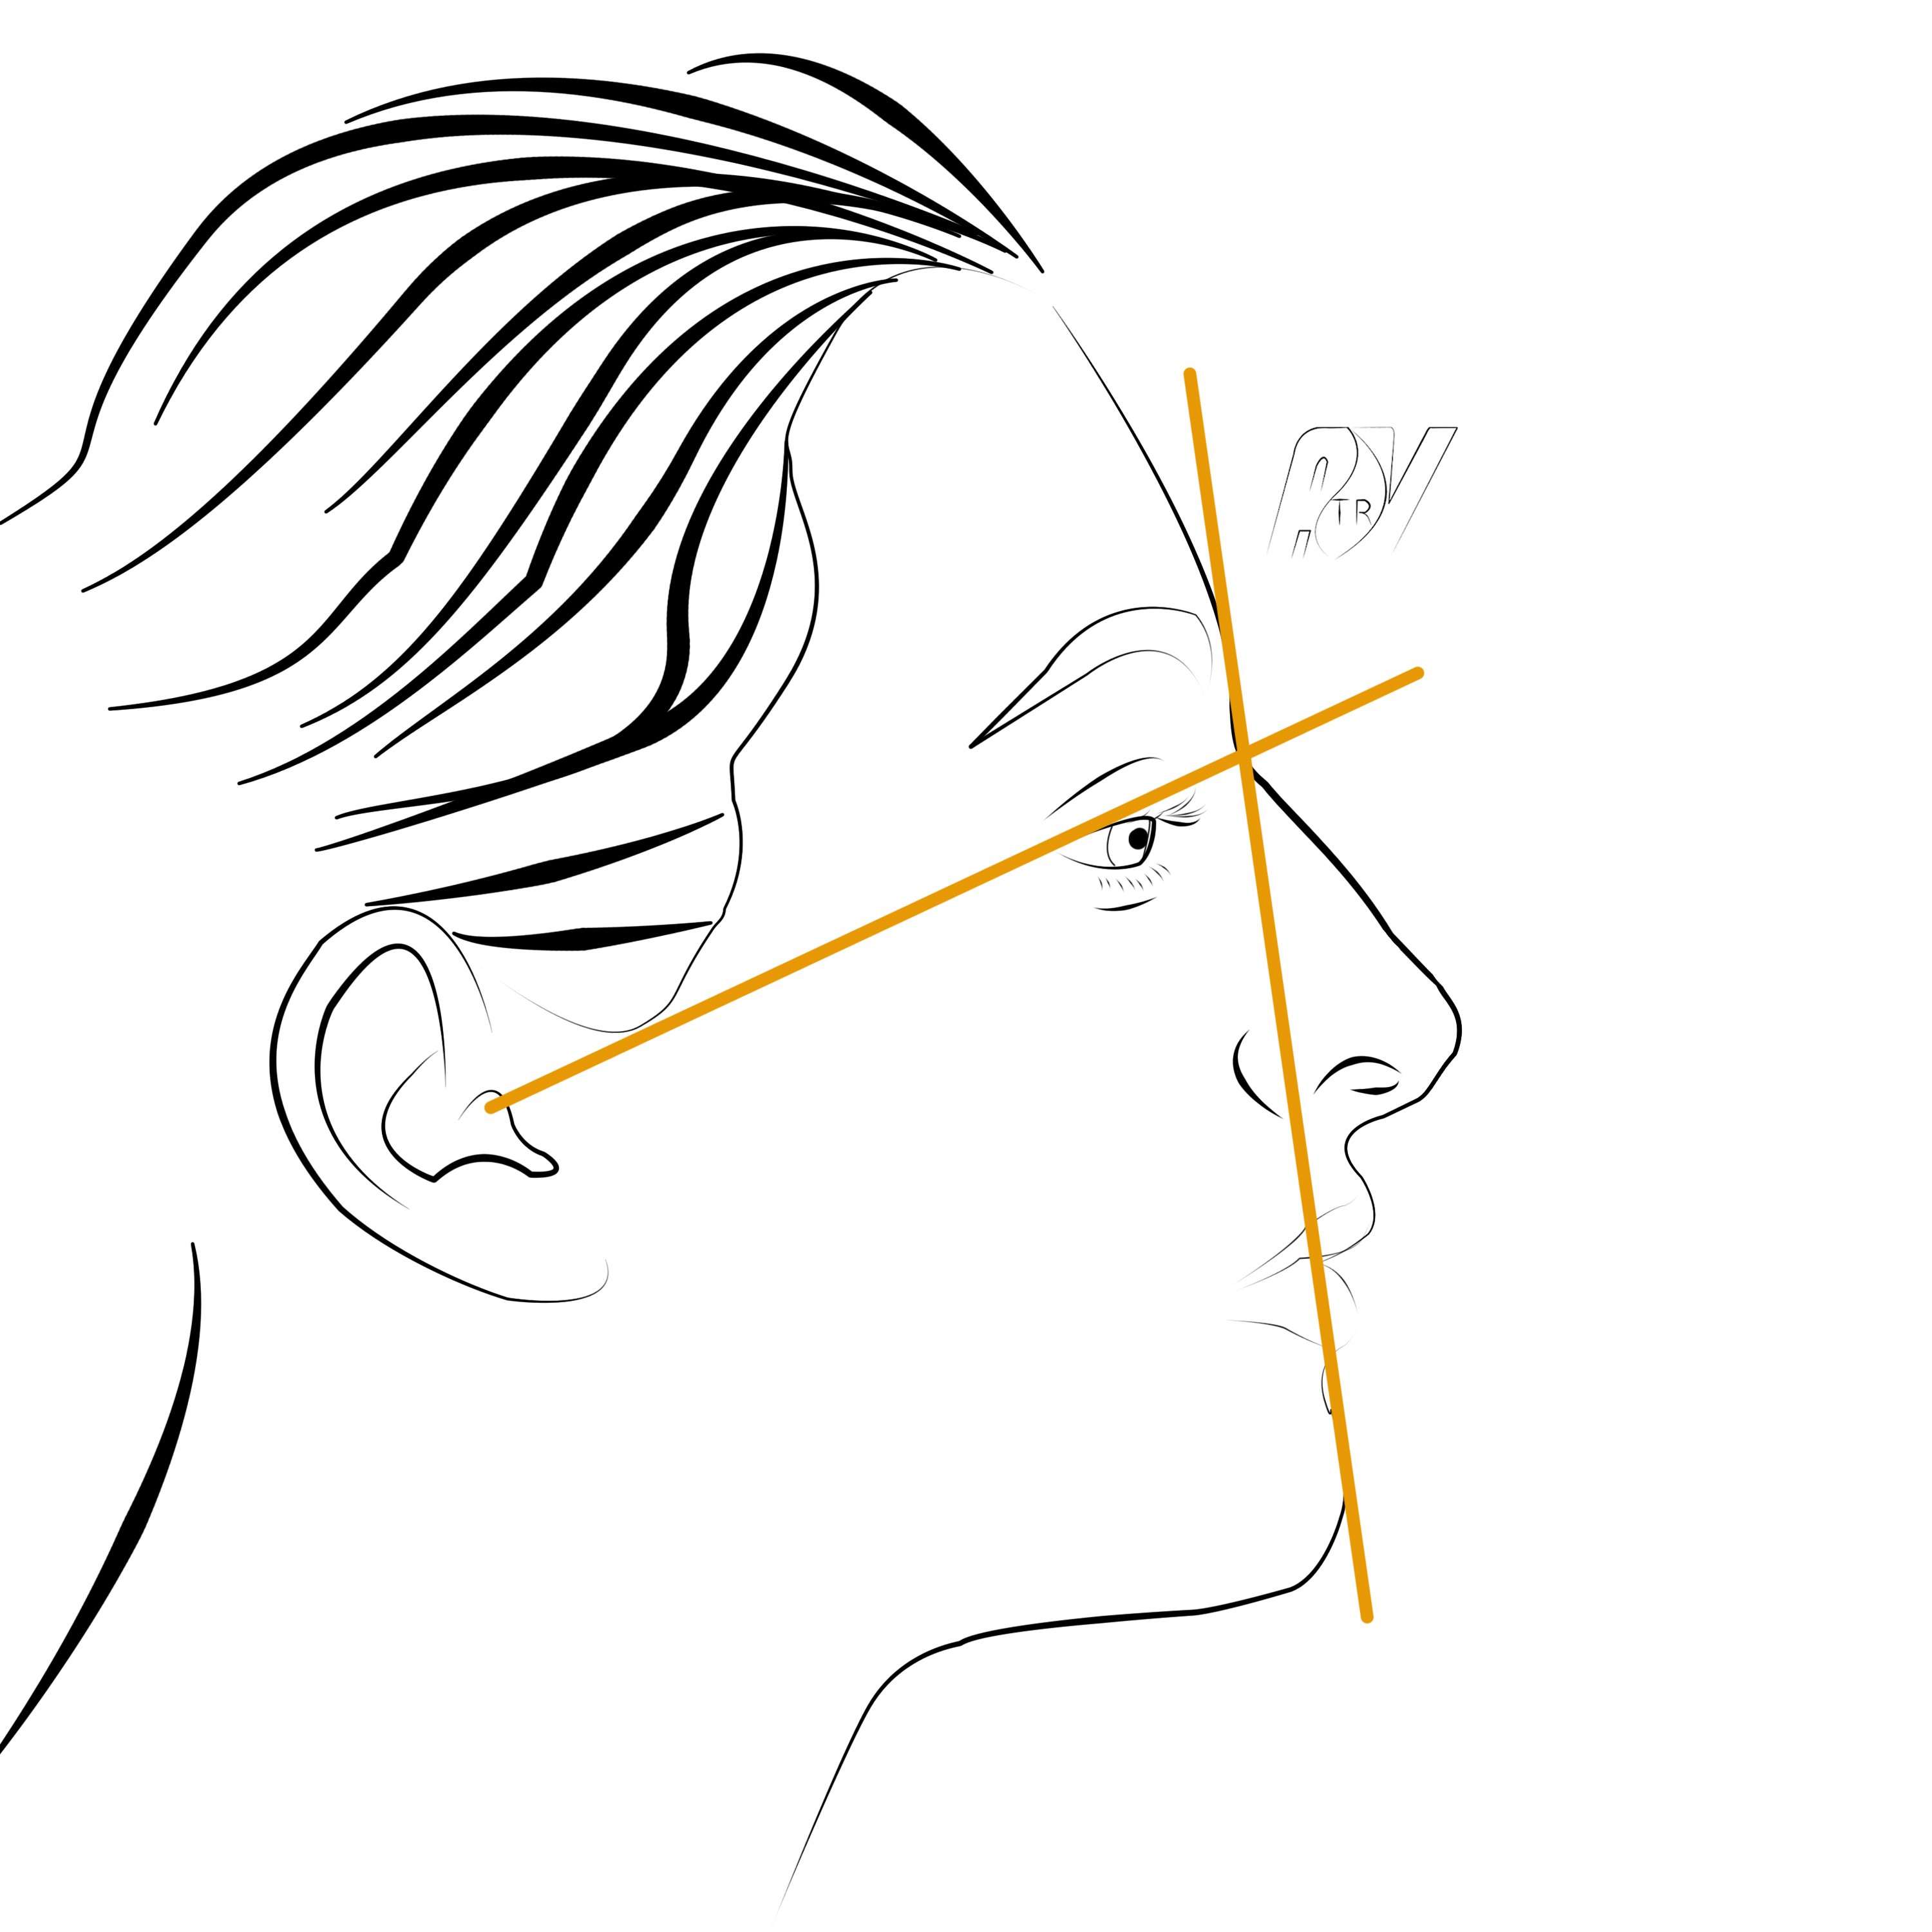
Naso-frontal angle osteotomy
The ideal position of naso-frontal angle can be defined by the landmark of the line connecting the superior edge of the external ear canal to the external cathys and the facial plan line – tangent to the forehead and to the superior lip. The angle must be situated on CAE line with Canthus 5mm away from the facial plan withdrawal.
Its filling is often associated to a high and important kyphosis for which we prescribe the exeresis in a monobloc with osteotome. This exeresis is associated to the naso-frontal angle digging by extending the landmark from the open-top to the suture between the frontal and the OPN, thanks to angled osteotomes.
The bump release from the osseous core is made with a wide double-shouldered osteotome which acts as a « corner ». This operation will demand to have, beforehand, meticulously freed the naso-frontal angle so as to release it from its attachments with weak subcutaneous tissues
Filling
Naso-frontal angle filling
The ideal position of naso-frontal angle can be defined by the landmark of the line connecting the superior edge of the external ear canal to the external cathys and the facial plan line – tangent to the forehead and to the superior lip. The angle must be situated on CAE line with Canthus 5mm away from the facial plan withdrawal.
Naso-frontal angle position
A digged naso-frontal angle can be corrected by cartilaginous grafts whose volume is determined by the importance of the angle and association digging, or a saddle. If in minor forms, a crushed cartilage modeling graft can be sufficient, the severe forms justify the use of the Diced-Cartilage-fascia (DCF) and sometimes of the costal cartilage graft.
Grafts
Diced Cartilage Fascia
Diced Cartilage Fascia is a very useful surgical technique to reconstruct nasal dorsum. It consists in collecting cartilage (septal, conch, or elsewhere) and inserting it in a temporal membrane in the shape of a cigarette. Many works provide a detailed description of this surgical technique. It enables a global increase of profile line, in a harmonious way, very useful in the cases of secondary, post-traumatic or ethnic noses.
Diced Cartilage Fascia
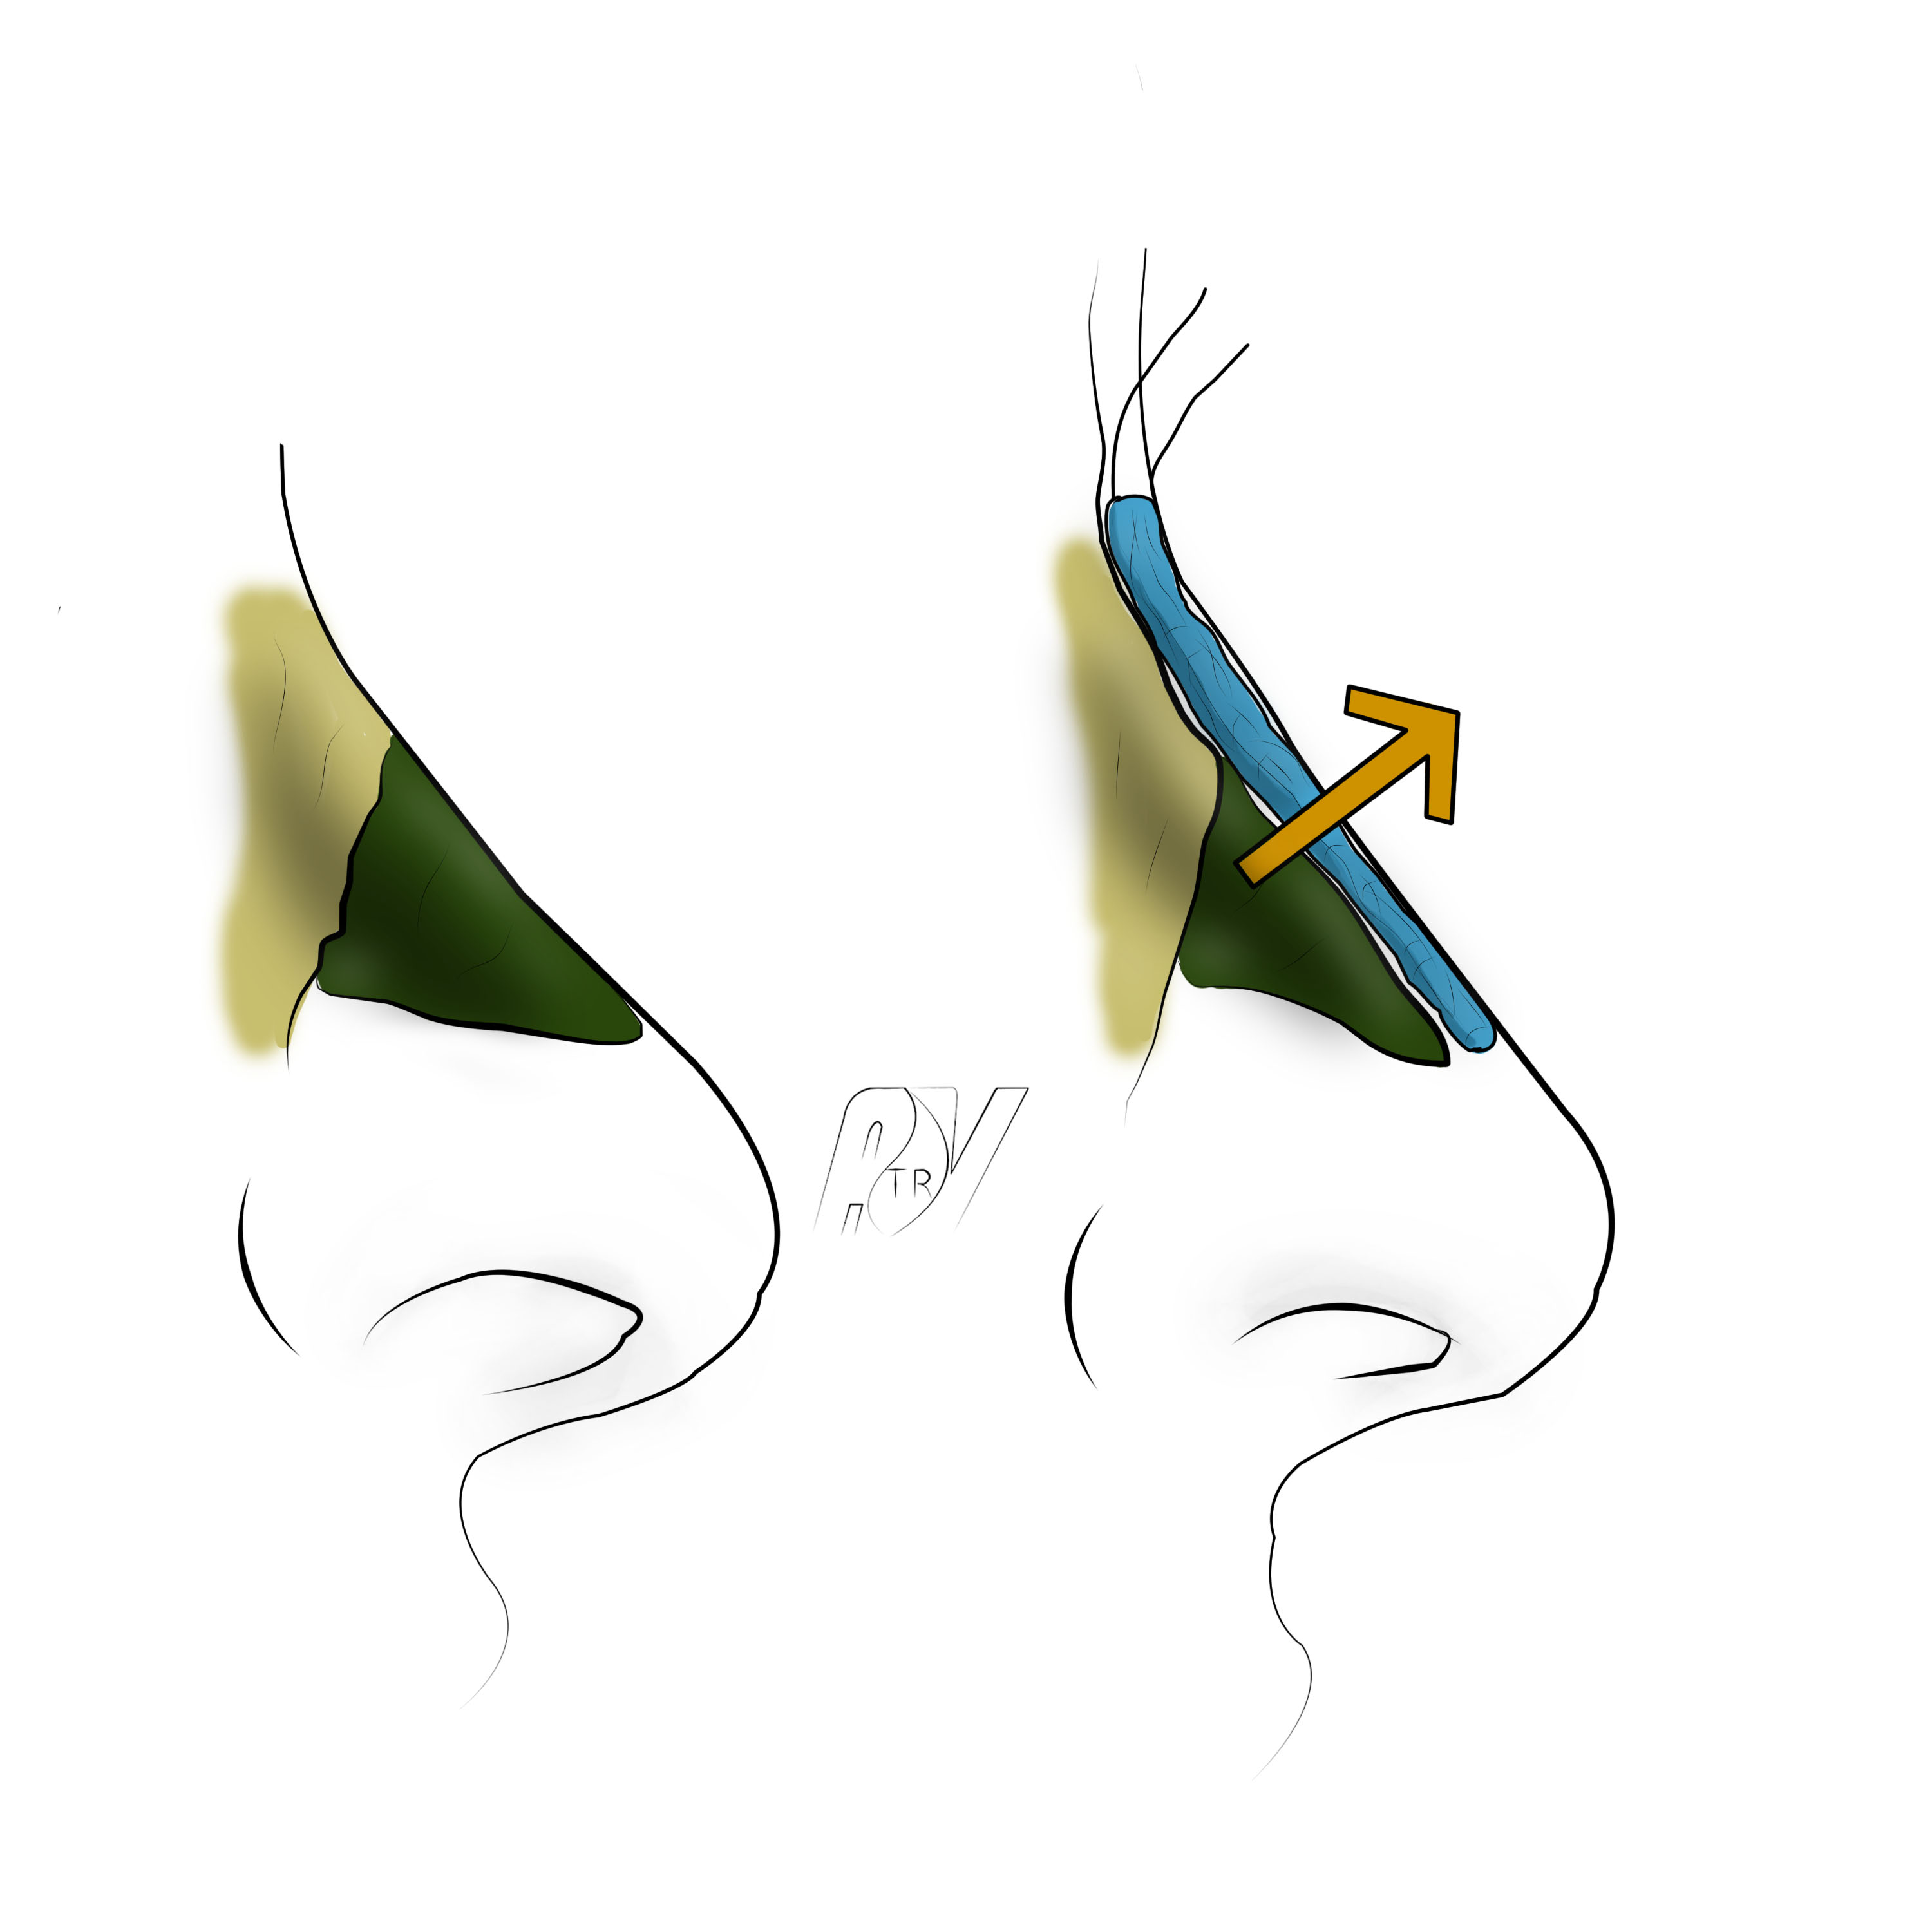
Spreader grafts
Spreader grafts can be used in three different ways :
- Correct a ventilatory trouble, by opening the intern valve
- Strengthen the cartilaginous septum in its superior portion (in cases of high fracture for instance)
- Surgically correct a reversed V, caused by the exclusion of the CLS and OPN.
Spreader grafts
Lateral osteotomies
Low-to-high osteotomy (or In-fracture)
Low-to-high osteotomies (or In-Fracture) are specified when :
- The nose is straight (lack of frontal deviation nor in C
- The bump section did not affect the high part of the clear bones
- The nose root is of a medium width.
In every other case, low-to-low osteotomies with transverse osteotomies should be made.
Low-to-high osteotomy (inclined lateral osteotomy or In-Fracture) starts at the level of the down part of the piriform opening, under the inferior cone, by a mucuous buttonhole made in the bottom of the nose wing. We use a buttoned osteotome directed first obliquely outside in order to hook the osseous edge. Then, we turn it inside to follow the oblique direction upwards and inside the lateral nose lining. Freeding the osteotome distance is not necessary. The latter, held horizontally, sections the rising sector in the jugal plan, tapping with a mallet that make a sound testifying the strength of the selected bone. Then the sound changes and we can spot the stylus button which has exceeded the widest area of the osseous nose.
Beyond, the width of the clear bones diminishes and we need tobear the handle more outside and downwards so that the osteotome would keep osseous contact. Plus, as a result of curves, it moves away from the internal canthus, makes itself superficial and reaches the clear bones massive area, 5 or 6mm from the dorsal ridge under intercanthal line. The mallet sound becomes massive at the same time.
Usually, while proceeding to the osteotomy, the left-hand fingers which are pressing down on the clean bone and checking the button progression, can feel the narrowing of the osseous nose. In-fracture is made by pressure towards inside and outside on the bone flap which generates a greenstick fracture at the roots of the solid superior osseous core of the flap. In any case, we need to apply pressure to break the clean bone.
This type of osteotomy tends to recreate a small bump by the rise of lateral linings (Push-up) at the moment of their approximation with the median line. That is the reason why, using a grater in addition can be necessary at the end of the process.
Low-to-Low osteotomies (or lateral low osteotomies)

Lateral osteotomy starts as previously written, at the lowest part of the piriform orifice. It is made with a straight osteotome and results upwards just before the internal palpebral ligament, until touching the frontal bone. The noise produced by the osteotome is a good marker to ensure we are effectively on the frontal, the sound becoming louder and louder. Then, we need to make a paramedian and/or transverse osteotomy in order to freed the nose component.
Paramedian Osteotomies (in pink)

Paramedian osteotomy is made with a double-shouldered osteome, pressed againt the clear bone. It cuts the superior osseous bridge at the alignment of the open-top and detach the clear bone towards outside by a fracture of its superior attachment.
Transverse Osteotomies (in green)

Transverse osteotomy is an osteotomy which aims at controlling the superior fracture line of the osseous component when a complete releasing of the latter is wished. It can supersede, or actually, be associated to paramedian osteotomy. IT can be carried out by below, laterally extending the paramedian incision percutaneously or straightly by using a small osteotome placed to the osseous contact through a cutaneous micro-incision of which the scar ransom is minimal perhaps void. It allows avoiding blocky fractures generating unsightly relief in post-operation time.
Out Fractures
Out fracture is a combination of a low-to-low ostetomy (or lateral low ostetomy) and a paramedian osteotomy which lead to luxation out of the bone flat after its complete release. It is usually necessary to make this movement with a thin gouge clamp sagitally held. It allows the exeresis of osseous edges hooked to nasal spine until it meets frontal notch.
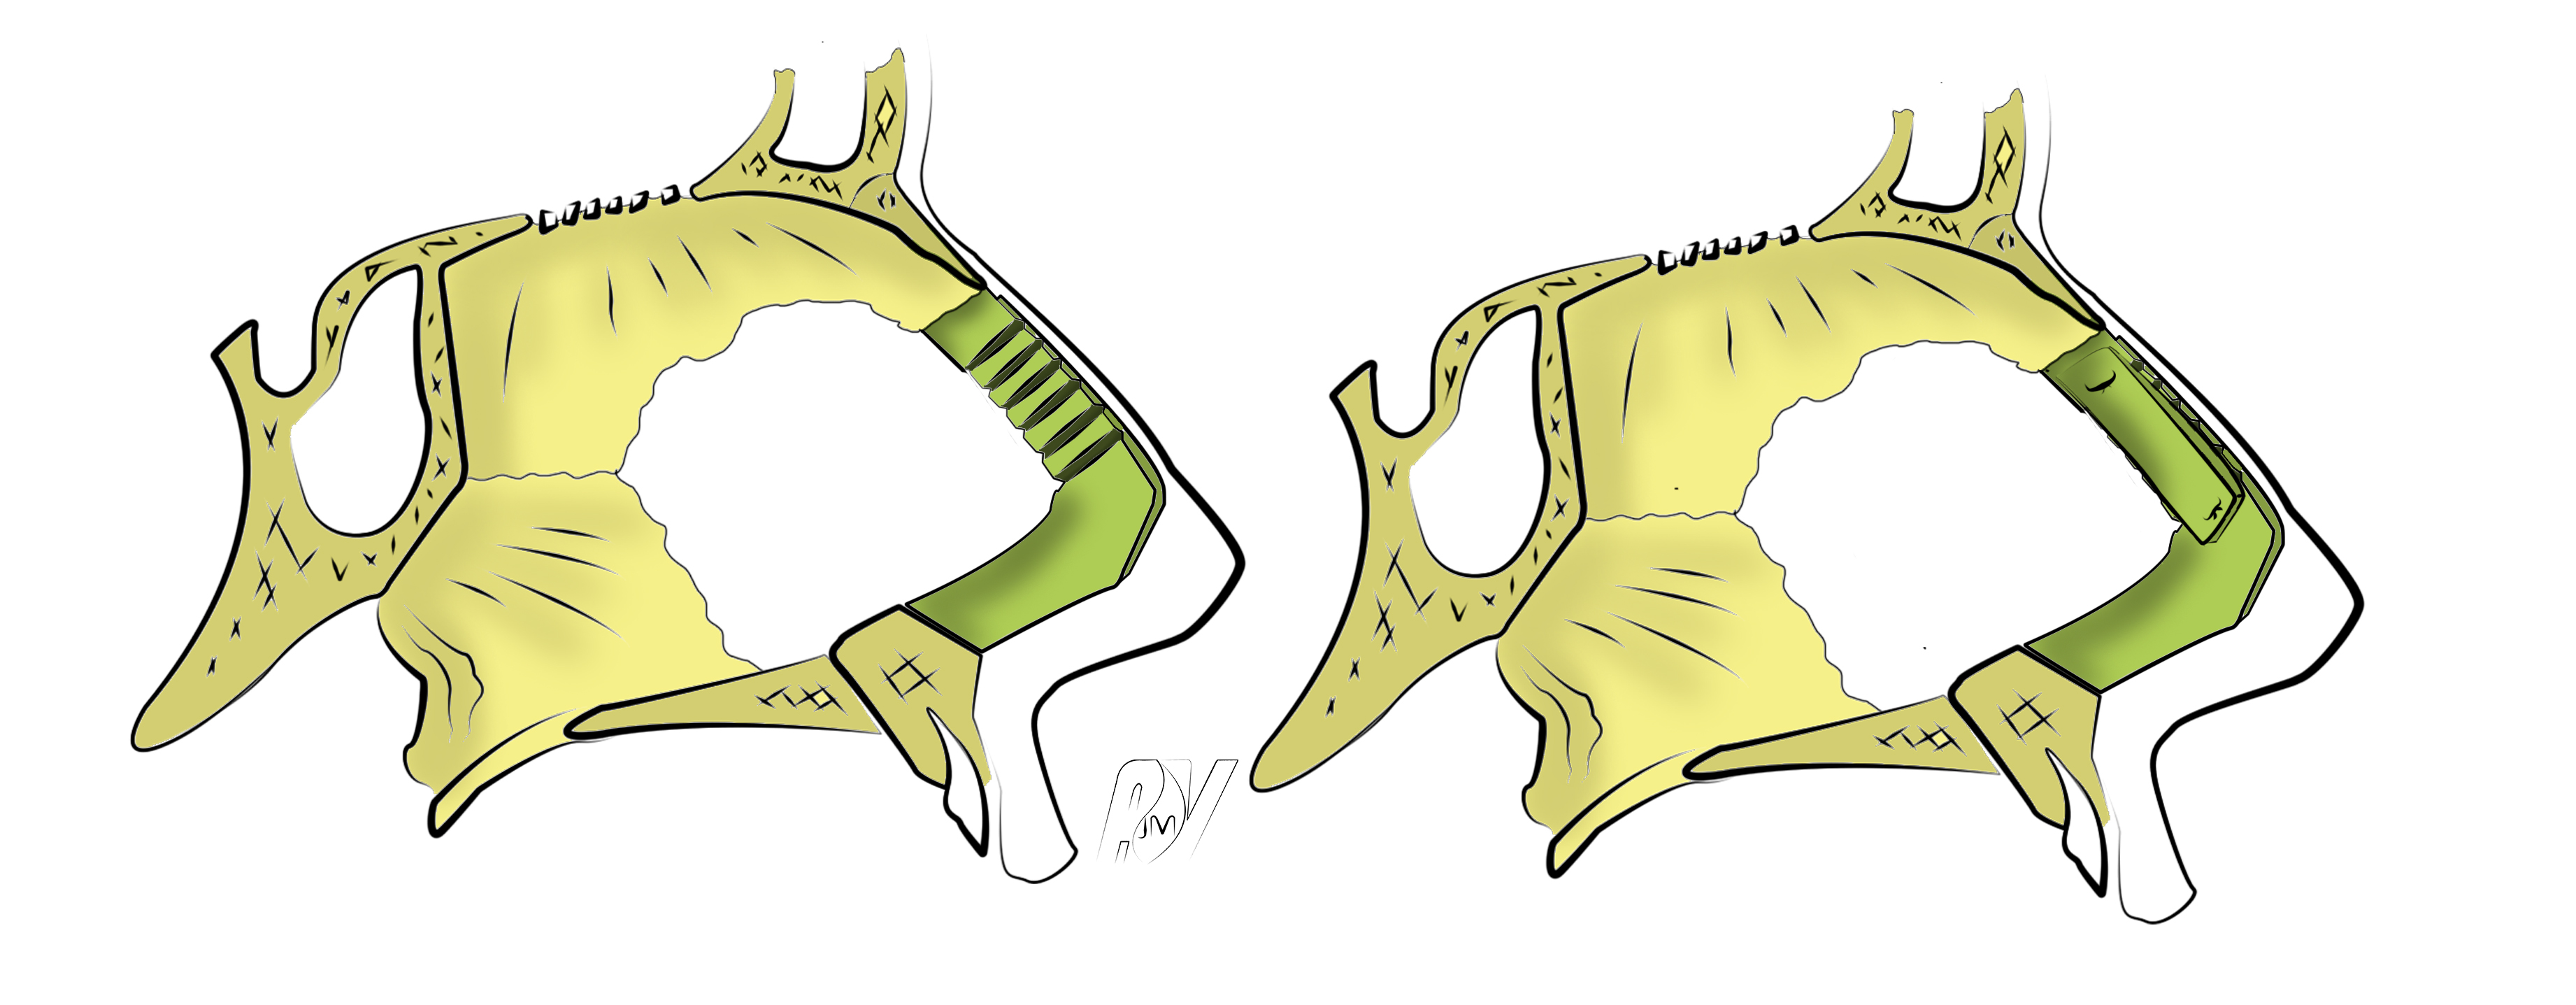
Columellar forestay

Columellar forestay (or « strut »)
The setting of a columellar forestay can be made by hidden marginal extended inferior way or by external way. It is often the first step of a tip of the nose surgery, since it allows the strengthening of the structure of the latter.
After the release of the internal sides of mesials, are poised in a sandwich structure a septal cartilage graft which is being pressed on the prior nasal spine and that is stitched in two (upwards and downwards), to the mesials. This projection of the tip technique can be made in an isolated way or in association with columella lengthening. It can be responsible of a tip cephalic rotation that can sometimes be excessive. In thes cases, a Tongue-in-Groove can be indicated.
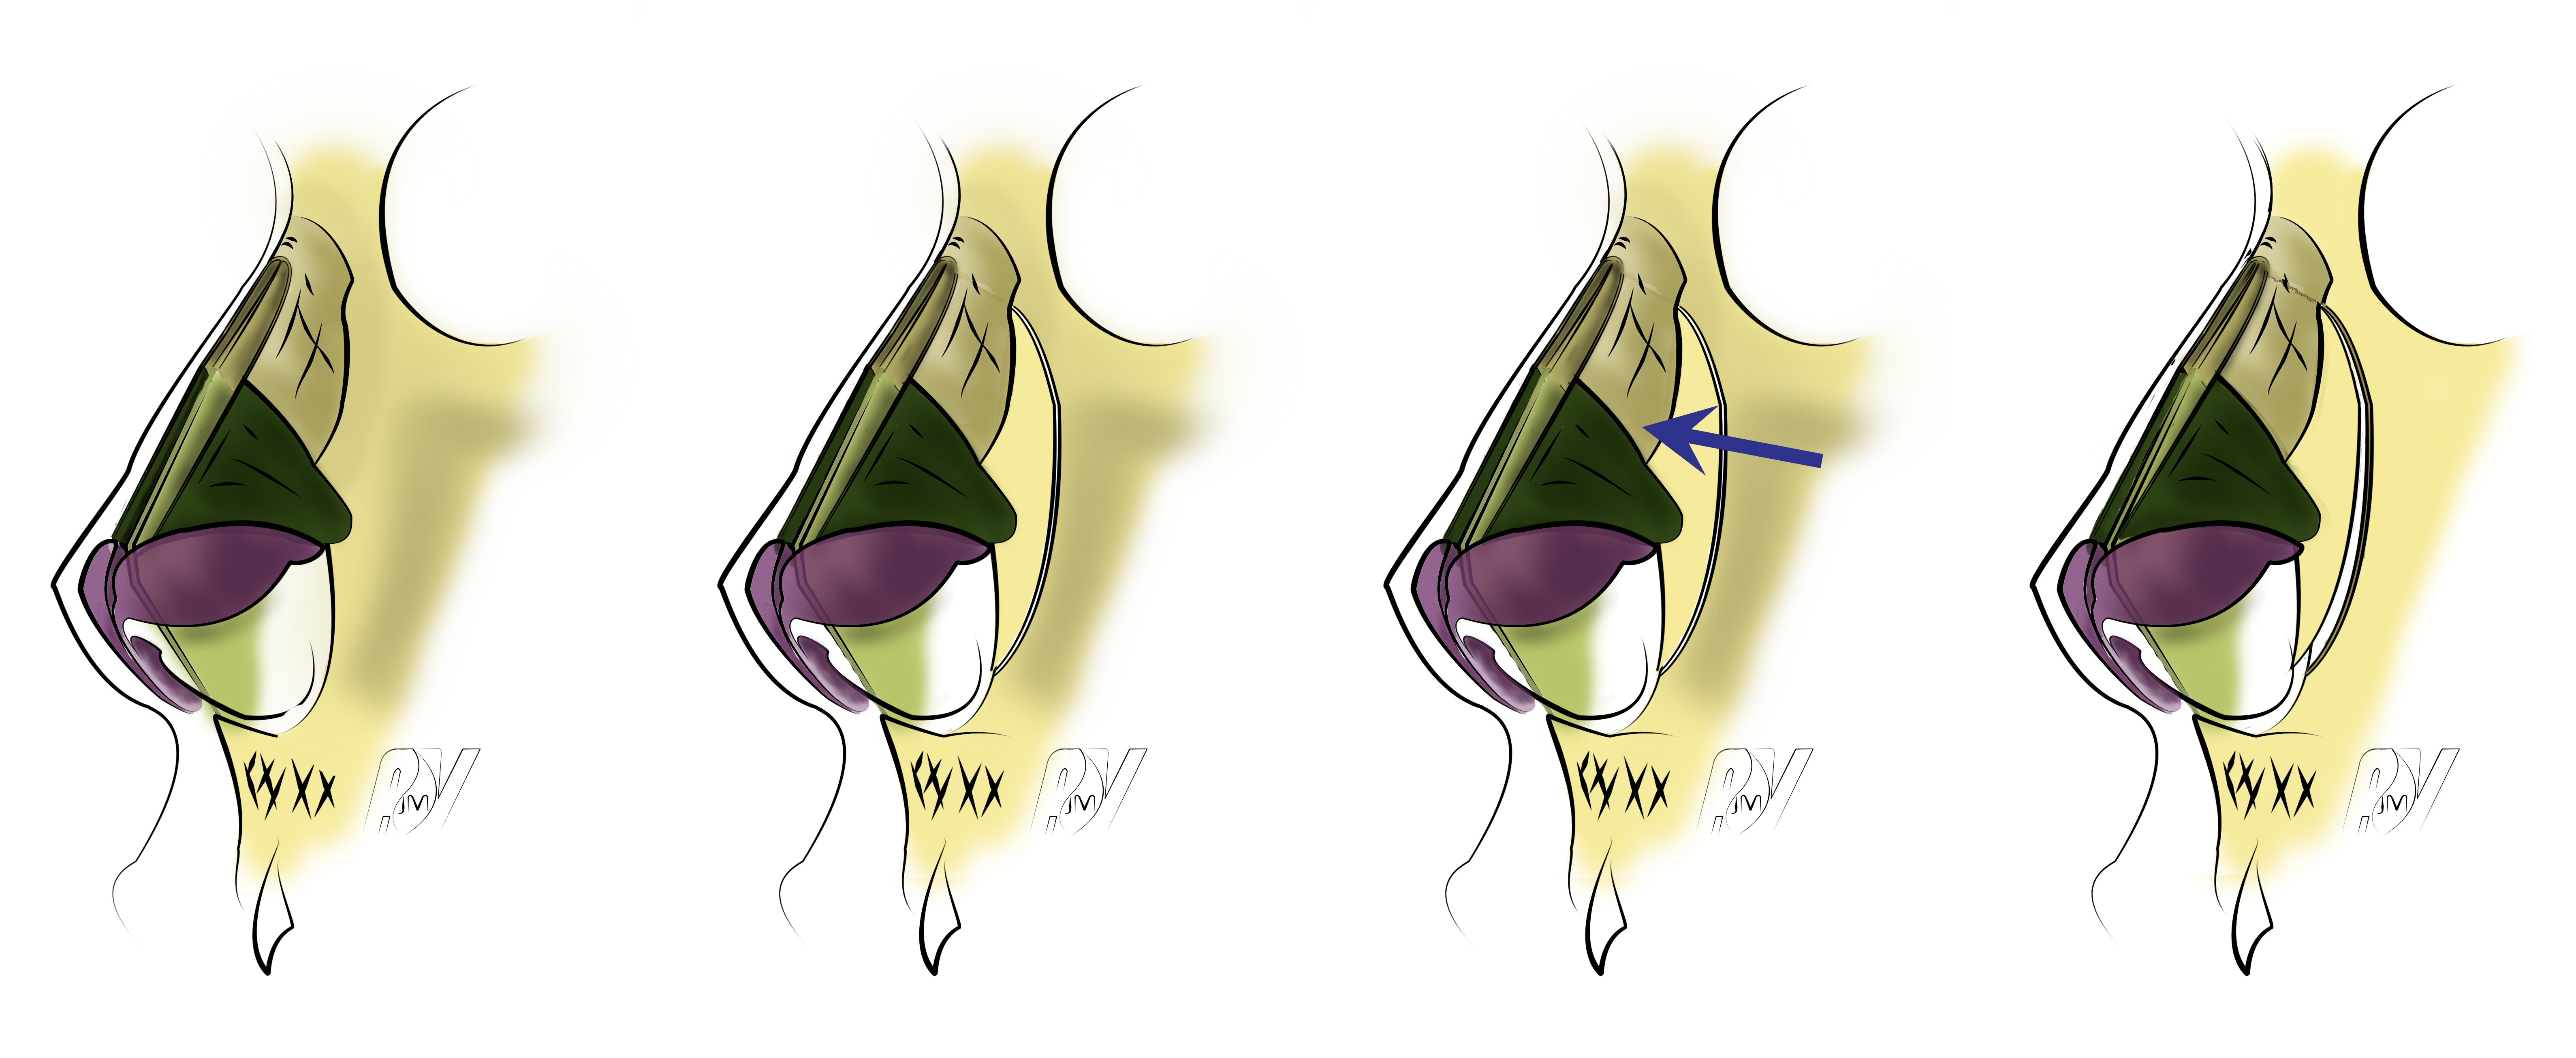
Resection of the wings superior strip. Keep at least 5mm of wings.
There are three goals when making this movement : making the tip of the nose autonomous by creating a supra-lobulary depression (supra-tip), better define the lobule by creating a direct depression immediately above and behind the domes and allow a slight cephalic rotation. This correction of the tip must be done before the bump resection as i twill be adapted to the reduction of the tip. The superior strip exeresis (often hypertrophic) must obviously not alter cartilaginous continuity of the wings arch. Steadiness in the wings arch time will be obtained by keeping a height up to 5 or 6mm from the residual lateral crus.
The key points of this movement are :
- The conservation of a sufficient height of lateral crus after superior strip exeresis. This height must be at leat 5 or 6mm in order to allow stability in the time of wings arch.
- Postero-superior edge of the lateral crus (or wings cartilage cauda) must always be respected. Superior strip resection must not be extended to that area.
By transcartilaginous way, you only need to practise the ablation of the cartilage situated above the incision.
By intercartilaginous way, you take off the skin and then the cartilage mucuous of the lateral crus with curves scissors, in a retrograd manner, until the cutaneous marks done at the beginning of the operation. Then we resect the superior strip with a lancet and a pair of scissors.
In the median confrontation of the lateral two, above the converse weak triangle, there is a layer of fat cells that can be meticulously resected to make the creation of a sus-lobular easier. However, the extensive resection of the tissue can induce the development of a scar fibrosis sometimes responsible for the coming of a nozzle of Corbin and must never be done.
No matter the chosen way, the resected cartilage is shaped as a crescent with a tapered edge directed towards the dome and a truncated posterior edge as it respects the caudal part of the lateral crus.
The hidden way -trans and intercartilaginous- allow the respect of the wings infrastructure, the dome are and their cutaneous connections. The inferior triangle skin of the lobule and nostril edge keeps its initial pattern, starting from the weak triangle. It is a particularly important point to give the tip of the nose a natural and faithful to wished esthetic criteria shape and form.
By external way, the superior strip exeresis is made under vision control. The complete release of the wings cartilage at the level of the domes and the medial portion of the lateral crus can confer a less natural aspect to the tip after the operation. This way must not be priviledged for tip nose correction.
Incomplete hockey stick
This technique is indicated in case of too developed or kinked in the shape of an accordion domes. Modeling is situated on the external slope of the dome. It does not take into account the wing inferior edge. It is not essential to practise a marginal incision, the eversion represents a sufficient access : after doing an intercartilaginous incision, we can take off the skin, by retrograd way, from the lateral, the dome and the mesial on all its extent.
Cartilage then released can easily be returned. We can then spot the gutter that corresponds with the dome. We practise a radiary incision of the mucuous 2mm inside the dome.
The external mucuous shred is unobstructed, largely discovering the laterla crus and the dome with the incisure marking the rough widening of the cartilage after the mesial. We can now proceed to a brief summary of the operation :
- If the dome is widened in its whole, we can proceed to an incomplete hockey stick taking off the same lateral superior strip as in the classic correction technique of the tip of the nose, and at the level of the dome, a triangle superior to 2 or 3mm from its inferior edge.
- If it is a dome in the shape of an accordion, we can add a second identical triangle centered on the second plication.
Wings resection with hockey stick technique
From the moment of the reinstatement of the wings and the mucuous suture, we can observe a refinement of the tip.
The domes sutures
The domes sutures are techniques that aim at either bring the domes closer in case of bifid point, or refining the domes in case of wide point, or even both.
We can then define it this way : scheme
Interdomal sutures or interwings sutures
It is a double point in the shape of a U poised in the high part of the mesial crus immediately under the dome that enable the reduction of the notch separating them. It is a correction of the bifid points technique. This movement needs an inferior marginal way (or a rim incision) but can also be made by external way. We use a mono-filament non-absorbable wire as a vascular suture wire 5/0 or even better 6/0. The needle goes through the mesial crus from one side, immediately backwards from its caudal edge, from the inside to the outside and inversely, immediately before the cephalic edge of the same mesial crus. In the contralateral side, the wire goes from the inside to the outside immediately before the cephalic edge to the mesial crus and from the outside to the inside immediately backwards from the caudal edge of the mesial. The wire is tied with a tension allowing the most natural result at the level of the tip. There is also, as for every tip suture, a risk of overcorrection leading to a « surgical look »away from surgery, once the edema has disappeared, The wire tension must then be measured and you must not hesitate to take off the point and do it again with a reduced grip if the nose seems too much pinched.
Transdomal sutures
This is a double point in the shape of a U which aims at reducing the width of the dome in case of excess at that level, which would have been unsufficiently corrected with the hockey stick technique or in case of asymmetrical width dome. This movement needs an inferior marginal way (or rim incision) but it can also be made by external voice. We use a mono-filament non-absorbable wire as a vascular suture wire 5/0 or even better 6/0. The needle goes through the mesial crus from one side, immediately backwards from its caudal edge. On the return, you keep the same height, from outside and inside, at the bottom of the superior edge of the lateral domal portion and then of the mesial domal portion. The point is tight depending on the degree of the wished correction. The tension of the wire will differ, from right to left, if the point is asymmetrical. There can be, as for evey point suture, a risk of overcorrection leading to a « surgical look »away from surgery, once the edema has disappeared, The wire tension must then be measured and you must not hesitate to take off the point and do it again with a reduced grip if the nose seems too much pinched. In some cases it will be necessary to dissociate the trans-domestic and inter-domestic points.
Projection
Hyperprojected points
An essay will bring you all the information you need about this topic.
Normal volume hyperprojected points correction
This technique is done by a hidden inferior marginal way. You need, in case of a normal modeling of the tip, to do anything to attempt respecting the domes. We will proceed to a usual exeresis of the lateral superior strip and then a setback of the domes by acting on laterals and mesials :
- The mesial will completely be dissected by an extended marginal incision pushed towards the root of the columella, determining a chondro-mucous shred that will be shortened as wished.
- The lateral and, if needed, its mucous are sectioned at the center of the nose wing, shortened as wished and sutured in the left posterior part of the lateral.
The alar set back
This global set back of the wing respect the dome and must be symmetrical so as the tip keeks its natural modeling.
Wing resections can be led by hidden way.
Too wide, square or pointed projected points correction.
The correction of too wide, square or pointed projected points is a surgical challenge that can be made by extended marginal way, that we highly recommend, or by an external voice. A point set back, as described for the correction of too projected points with normal volume, can be made in association with an incomplete hockey stick technique and dome sutures.
If the set back of the tip is to be impossible, the best technique seems to be the dome resection followed by a reconstruction of the cartilaginous continuity with a modelling cartilaginous graft :
- You need to release the dome and its parts close from the mucous mount underlying in case of extended inferior marginal way or of the underlying mucous plan in case of external way.
- The cartilaginous resection must concern the internal dome slope, so as the lateral constitutes a shred that naturally curves towards the mesial and does not represent a cartilaginous extremity which might create a tip irregularity.
- The two cartilaginous edges must be meticulously brought together and covered by a slat of cartilage (taken at the level of the surplus of the lateral and crushed, if needed).
- This slat will be sutured with the mono-filament non-absorbable 6/0 wire.
- Some biological glue solidarizes the setting and the underlying mucous.
This technique, meticulously practised, leads to fine results since the anatomic situation of the mesials and laterals are respected. We recreated a solid cartilaginous arch that the mucous suture finalizes. Results are stable and natural.
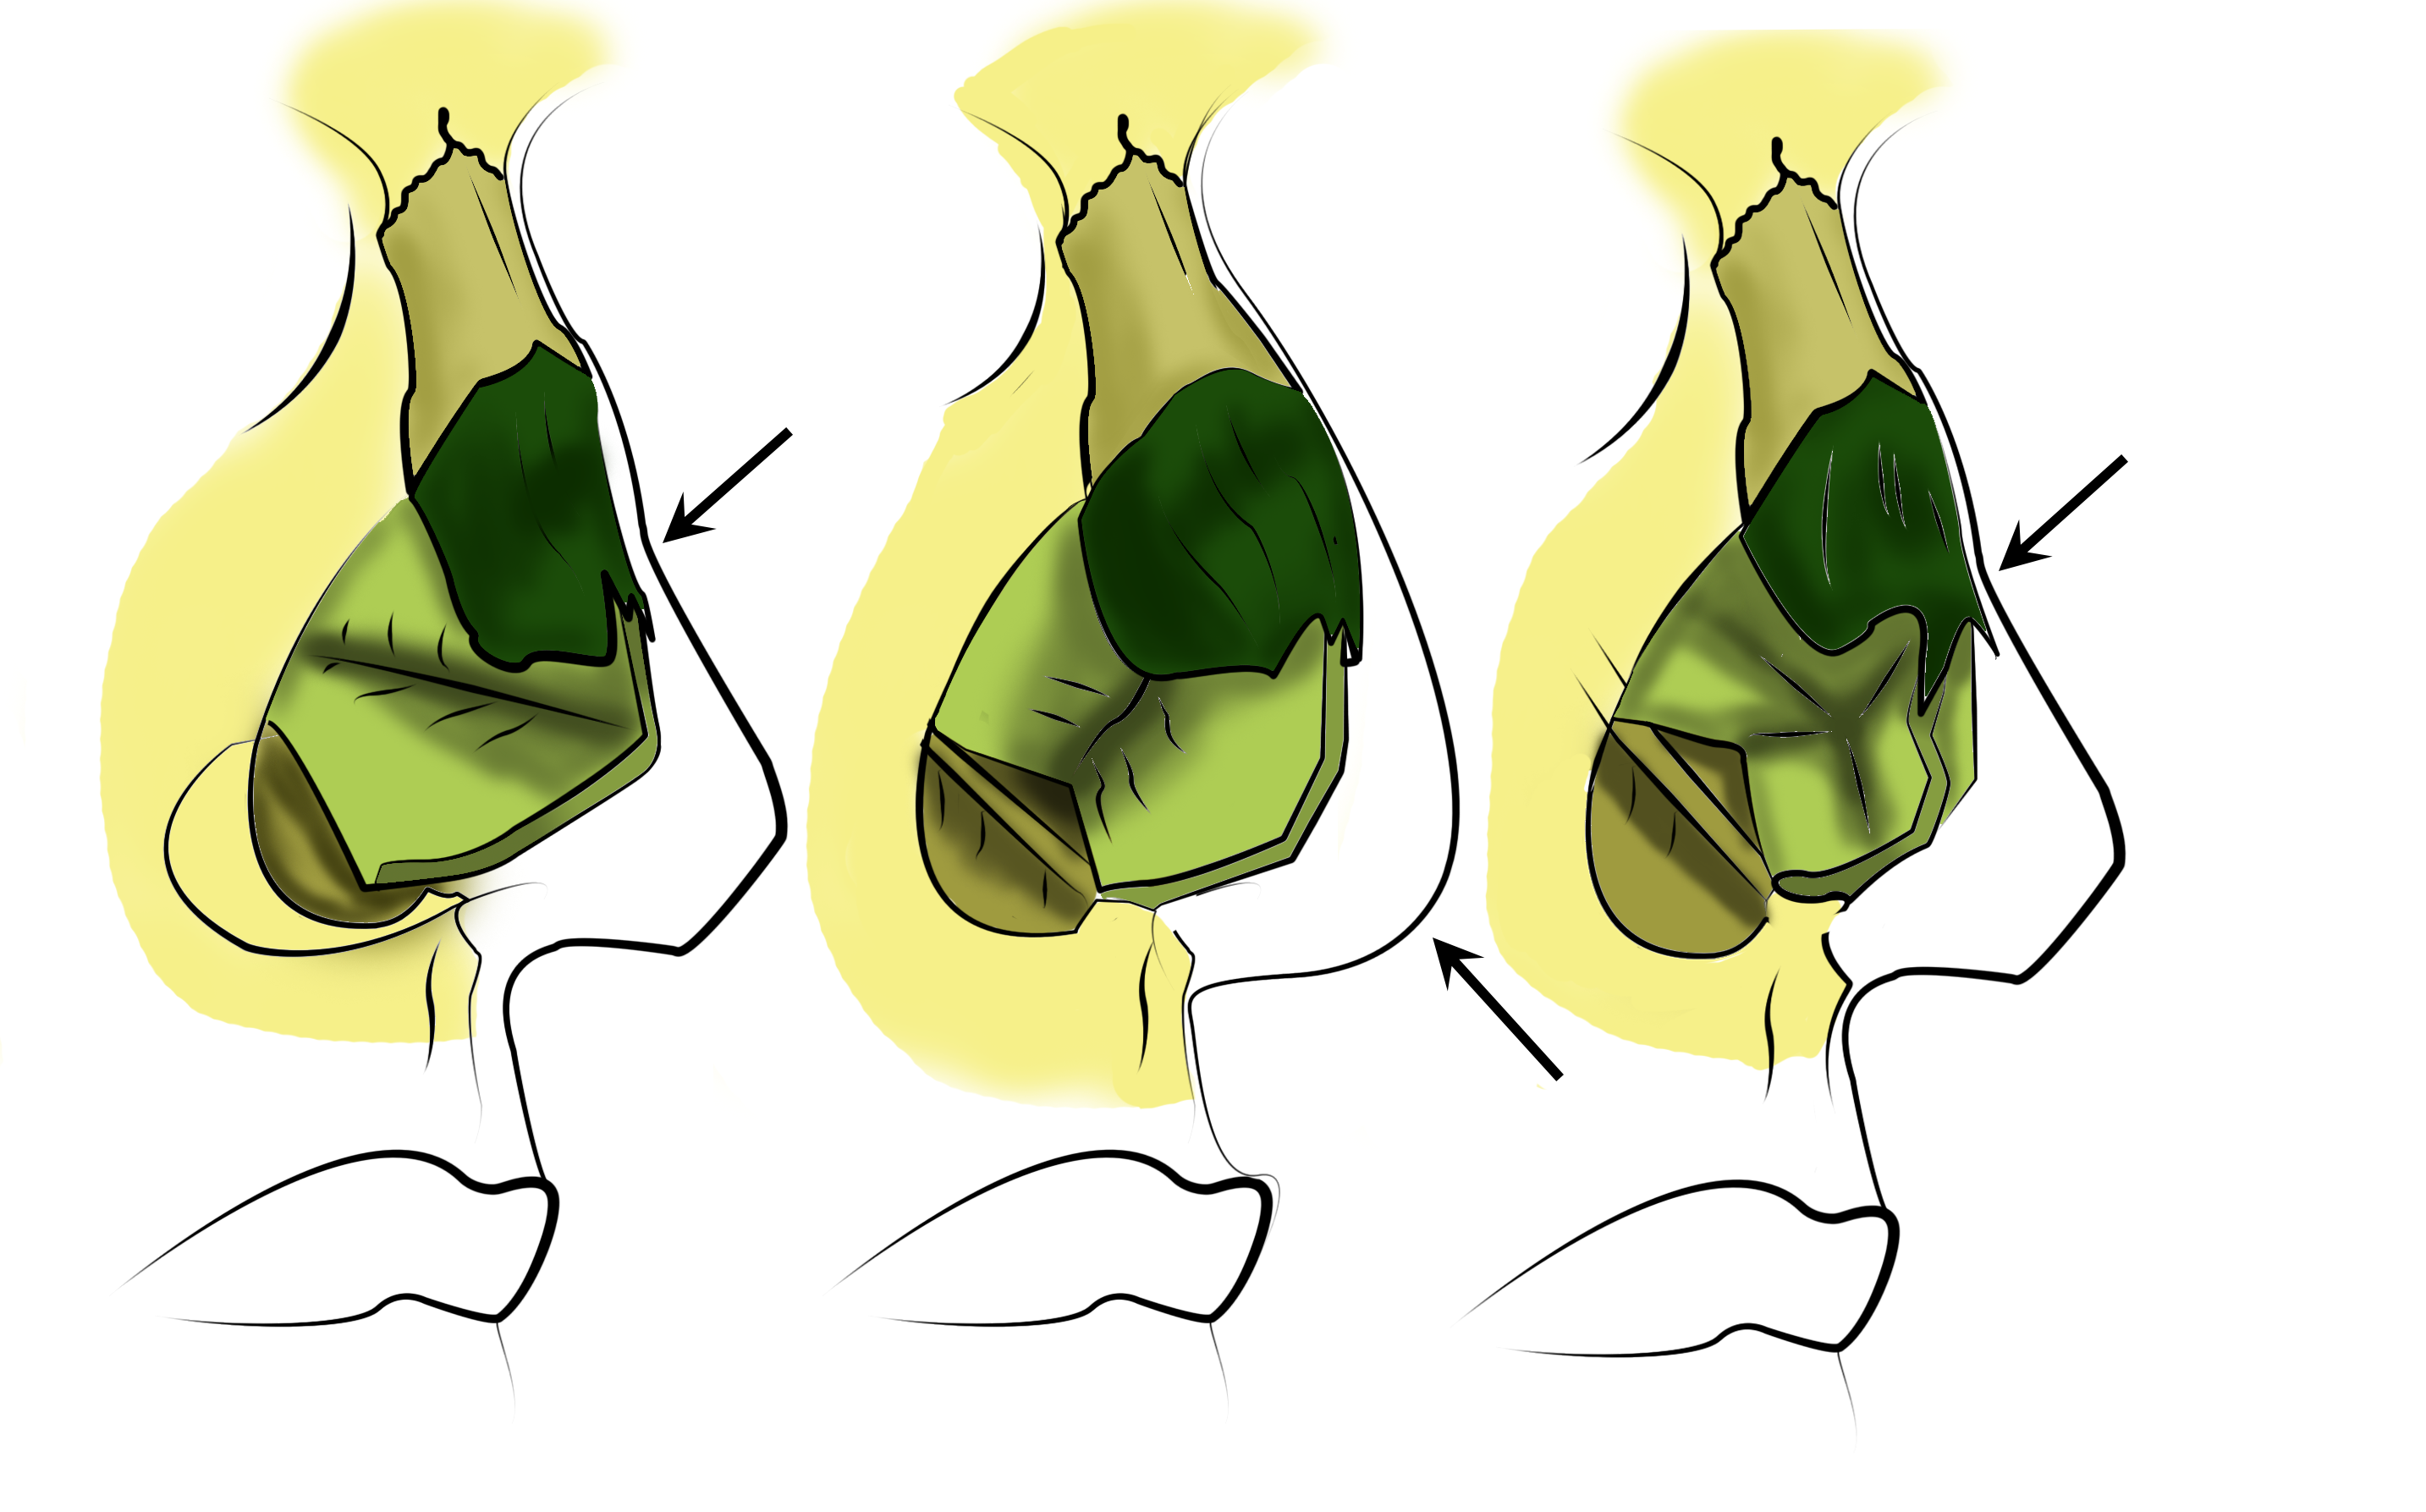
Falling points
Un An essay about this topic is available on ADV website. In case of falling point, the technique you have to choose essentially depends on the projection of the nose tip. You can see the illustrations of the different surgical techniques below.
Alolateropexy

The alolatéropexy
This technique consists in suturing the CLI to the CLS. Usually made in case of normoprojected point, this technique also supports projection defects of the point since the sutures position allows its modification.
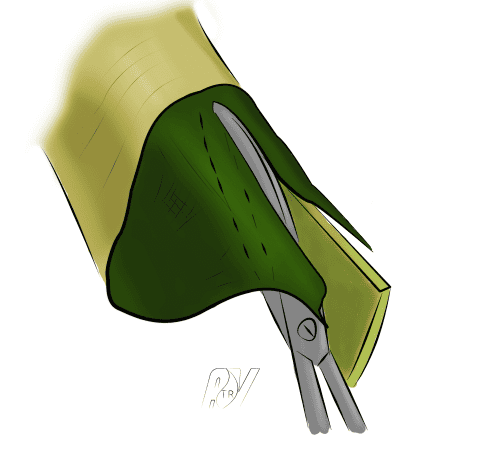
Lateral cural steal
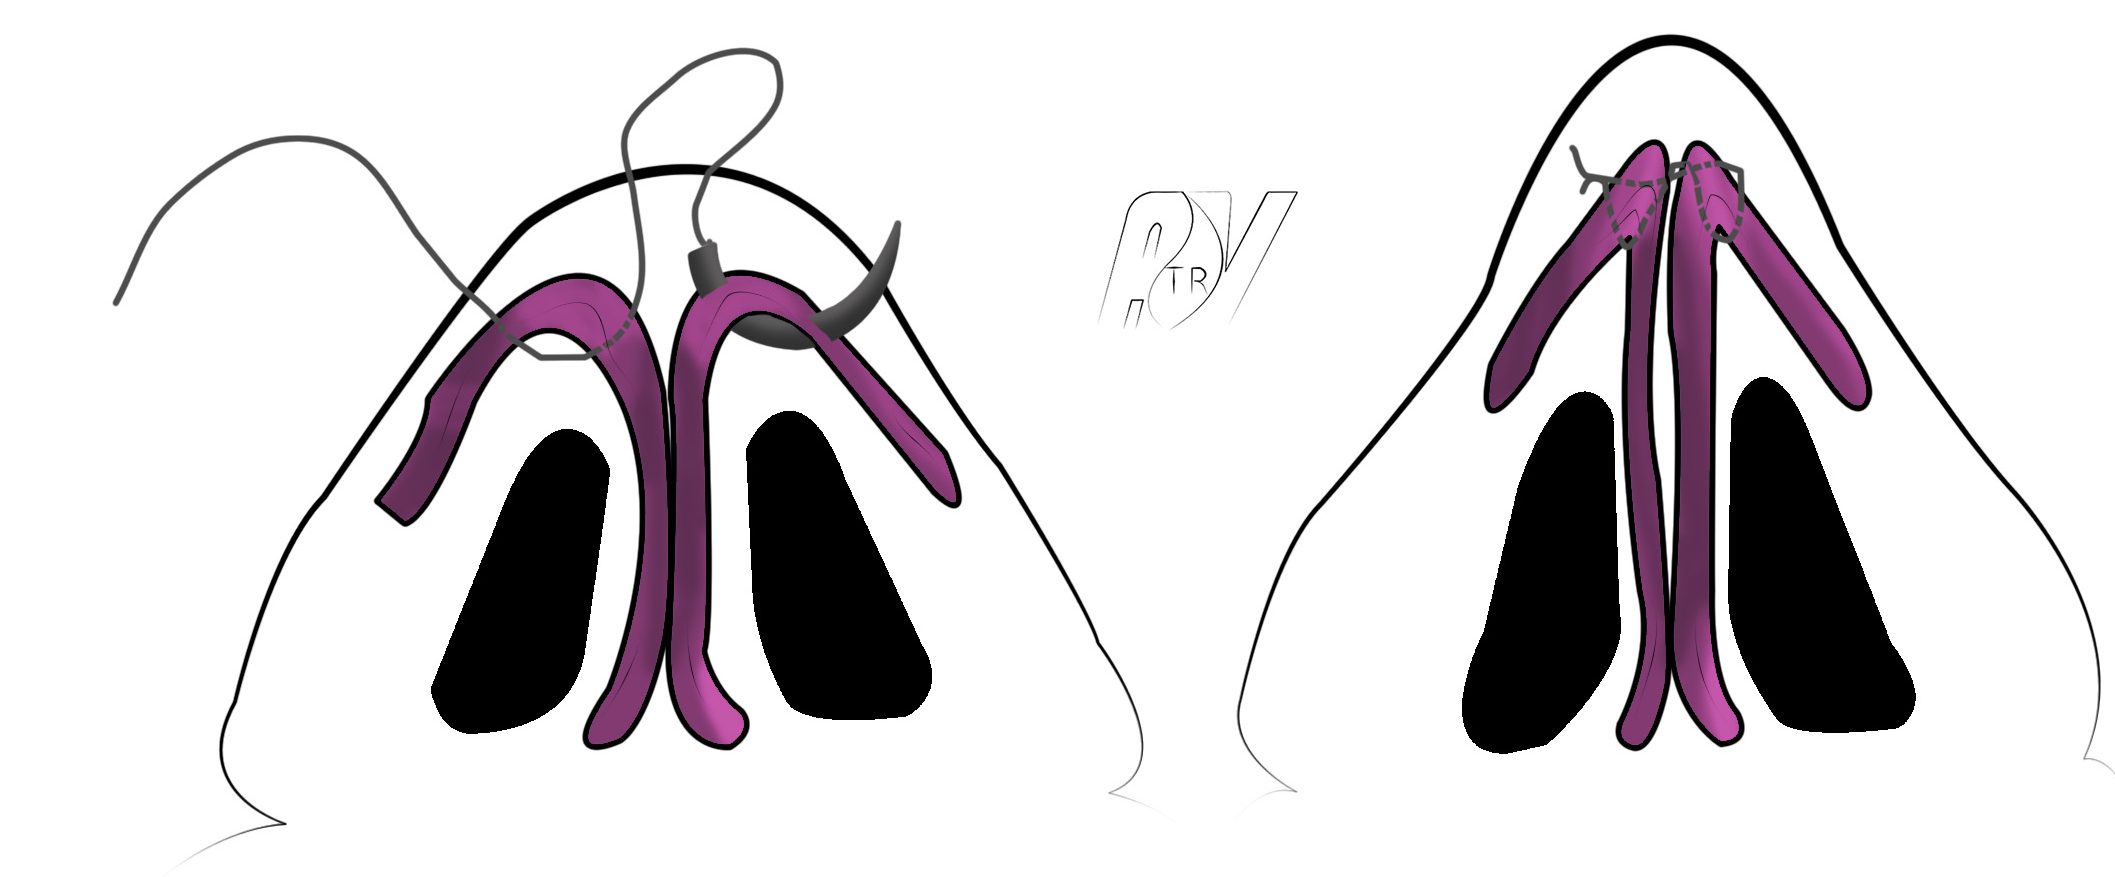
The Lateral crural steal
The Lateral crural steal is a technique which, thanks to sutures, allows the point raising while increasing the projection of the latter.
Lateral crural overlay

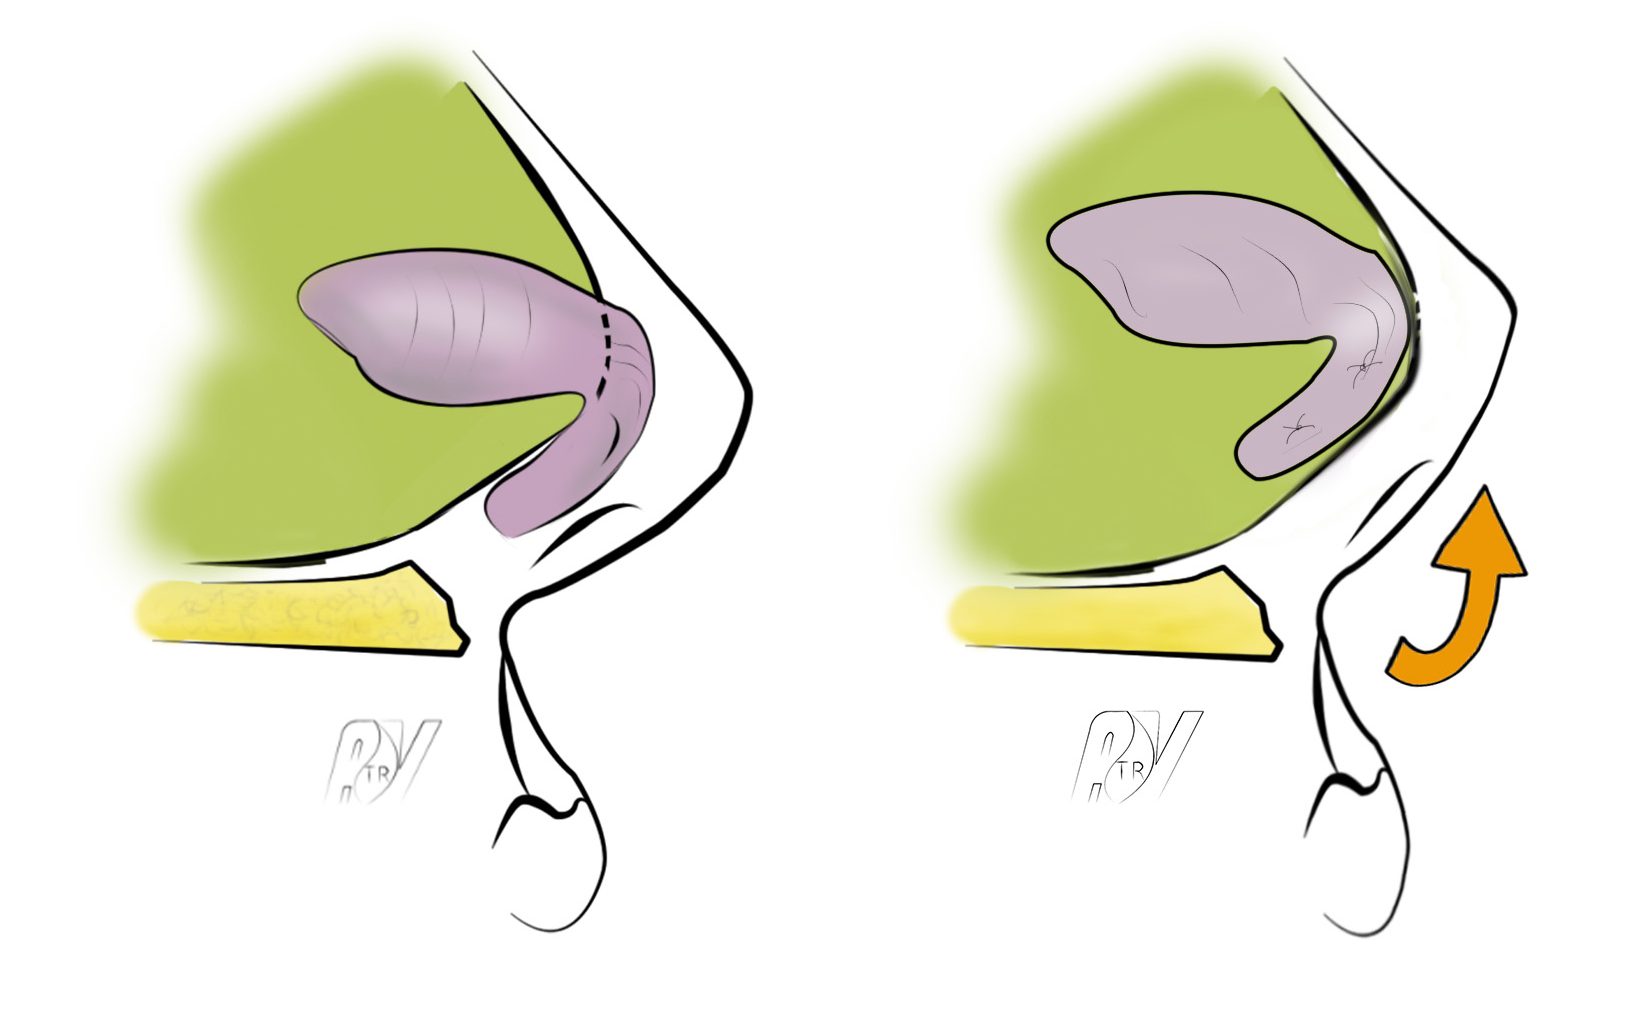
The Lateral crural overlay
The lateral crural overlay allows the reduction of the nose tip projection while correcting a falling point by cutting the lateral part of the CLI and resuturing it more laterally.
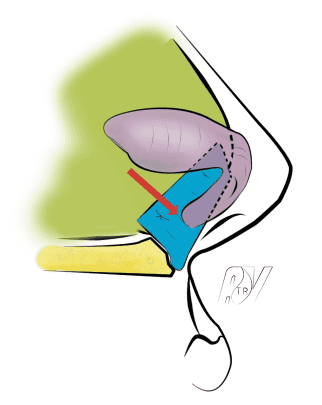
« Tongue in groove »
The « tongue in groove » is a sophisticated technique about the positioning of the nose tip allowing the reliable and definitive fixation of its projection and cephalic rotation. It is made more generally by external way but an extended inferior marginal way still remains a possible way.
After releasing the internal sides of the mesial crus on their whold height, from their edge to the dome, we can put in the form of a sandwich, between the 2 mesial crus, the septum caudal edge (or quadrangular cartilage), pressed on the previous nasal spine, and then we secure it to the mesials with transfixiant points with solid core wire, non-absorbable and colorless, 6/0/, placing the point to the wished position. The opening of the nasolabial angle can then be increased or diminished, just as the point projection.mentée ou diminuée tout comme la projection de la pointe.
If the nasal septum is too short, a septal extension graft, attached to the residual septum, can be set before the réalisation of the « tongue in groove ».
The Tongue-in-groove
Lengthening of the columella by mesial edges suture.

Mesial edges suture
This technique is made by extended inferior marginal way or by direct access from the mesials edges. After releasing the mesials edges with their cutaneous coating, which implies an incorporation of a part of the nasal limit to the columella, a suture in the form of a U attaches the two small shreds of mesials to the columellary forestay previously attached to the mesial crus. A short incision of the nasal limit releases nose wing and allows the suturing of the defect cutaneous generated by the confection of the shred.
Large columellary base correction
The columellary base remains widened as a result of protrusion of mesials lines. With a short marginal incision, you need to dissect the mesials lines very close to the cutaneous plan. The correction to bring depends on the point projection. If the latter is correct, you only need to take off the surplus of cartilage and sometimes cutaneous surplus. If an increase of the point projection or a lengthening of the columella are wished, suturing the mesials edges in their back will be needed.
Columella defecting position correction
The technique here is simple and allows the extraction of the columella by reinforcing the « tent’s foot » of the mesials (or median branch and inferior of the Anderson tripod). An easy dissection with iridectomy scissors is practised between the mesials in the base of the columella until between the domes to create the bed of the graft of sagittal support. A piece of septal cartilage of 2,5cm long and wide of 2mm, in the shape of a shuttle, is set by 2 leading wires going through the columellary skin. The first one, attached to the superior edge of the graft, transfixes the lobule, between the two domes. The second one is attached to the prior edge of the graft, at 8mm from its caudal edge, transfixes the skin into the naso-labial angle. A grip on these wires positions the graft that is stabilized by biological glue after mucous sutures. A point in the form of a U transfixing the posterior part of mesials can alo improve its stability. This graft remains very stable as it is well connected with the columellary skin and its posterior portion is anchored in the naso-labial angle. It can only behave as a support if an inter-septo-columellary incision properly released the base of the nose and allowed the cephalic rotation of the point.
The extandal septal graft allows the extension of the nasal septum in case of retrused columella. It is attached to the nasal septum by 2 or 3 tight points so as to avoid a any secondary movement from the graft.
The septal extension graft
Nostril resections
These techniques consist in a resection of the cutaneous surplus at the level of nose wings and can vary depending on the case. They are transfixing, with external and internal nostril slopes in case of volume-increasing nostril.
They only concern the external nostril side, if the nostril is of medium size but if a hypertrophy of the nose wing lobule can be observed.
The key points of these techniques remain :
– carefulness in their indication
– symmetry respect
– respect or reinforcement of the muscular plan which encourages the normal enrollment of the nostril. This plan also has the advantage to visualise the narrowing obtained at the level of the nostril and the ecedentary overflow cutaneous that must be resected. Risks of an overcorrection or an asymmetrical correction are then diminished :
– la possibilité de le faire dans un second temps sous anesthésie locale
The possibility to do it in a second time under local anesthesia.
Incision :
- Superficial concerning only the cutaneous plan
- Limited to the inferior middle of the alo-jugal junction
- Located at 1mm before the cutaneous fold
- Extending in the nostril limit, just outside the small lobule marking the base of the columella. At that level, the incision must draw a slight curve with external convexity (Medial flap of Sheen).
Dissection of the muscular plan on the two banks of the incision, in the jugal plan and in the nose wing, without neglecting the nostril hemline area.
Setting of 2 points with a wire of slow resoption at the level of the nose wing and the nostril hemline. They take the most distal portions of the dissected muscle. By tighting them, we can obtain a shortening of the nostril
Section with a lancet of a cutaneous overflow at the level of the nose wing, the nostril hemline and the internal mucous plan if needed.
Cutaneous suture with a non-absorbable wire a bit tight, in order not to create an attrition area, that is taken off on the 5th day.
